Overview
The HTML Entity Converter transforms special characters into HTML entities (encode) and converts HTML entities back to readable text (decode). Essential for web developers who need to safely display text on web pages, especially user-generated content that might contain characters like < > & that could break HTML or cause security vulnerabilities.
Interface layout
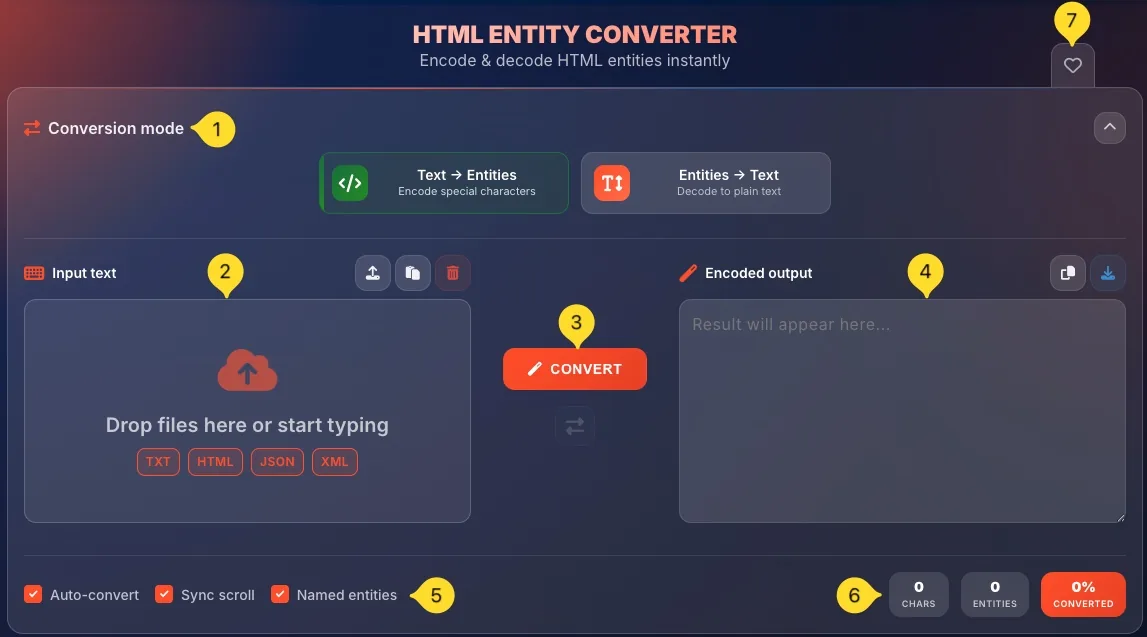
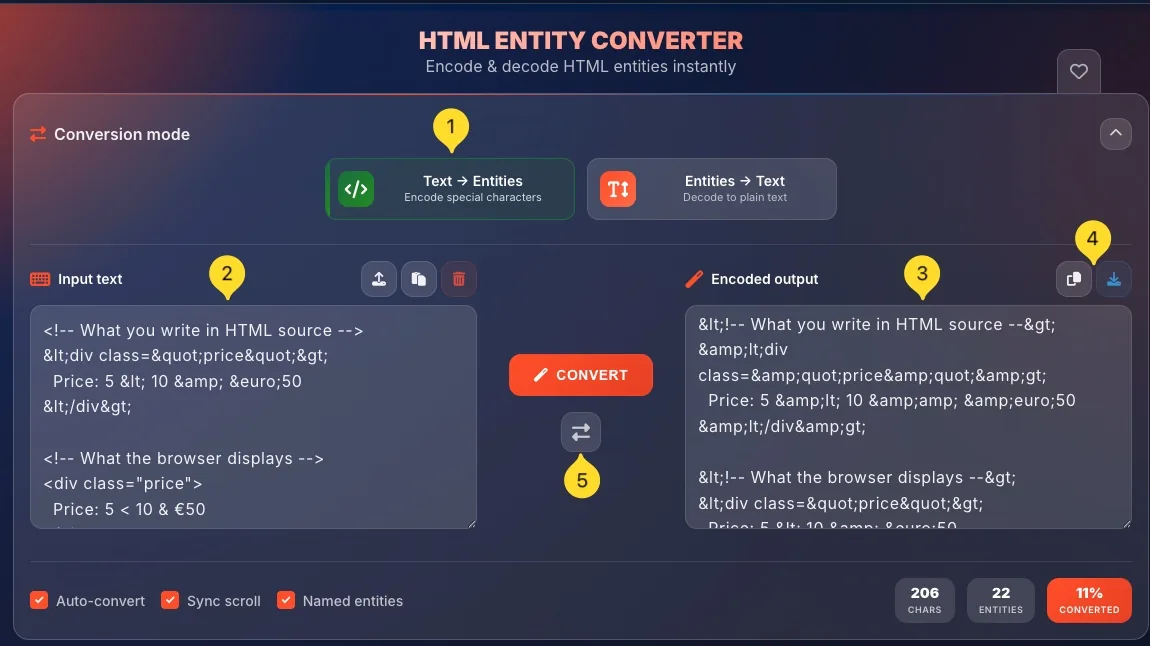
The HTML Entity Converter has a clean, two-panel layout with mode selection at the top. Here's what you'll see when you open the tool:
Conversion mode selector (top)
At the top, you'll find the Conversion mode panel (collapsible with a chevron icon) containing two mode buttons:
• Text → Entities: Encode special characters - converts plain text to HTML entities
• Entities → Text: Decode to plain text - converts HTML entities back to readable text
Click a mode button to switch between encoding and decoding.
Input panel (left side)
The left panel is for entering your input. The label changes based on mode:
• In Text → Entities mode - Input text
• In Entities → Text mode - HTML Entities
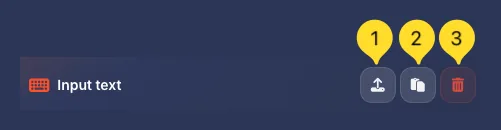
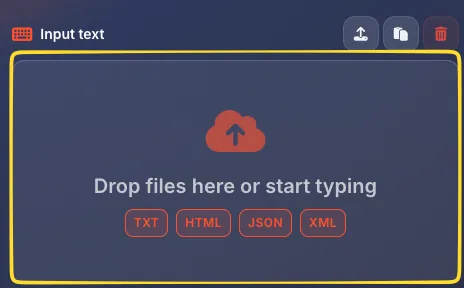
Header buttons (top right of panel):
• Upload (cloud upload icon) - upload a file to convert
• Paste (clipboard icon) - paste from clipboard
• Clear (red trash icon) - clear all input
Drop zone:
• Drag and drop files or click to type
• Supported formats shown: TXT, HTML, JSON, XML
Convert button & Swap (center)
Between the two panels:
• CONVERT (large orange button) - click to perform the conversion
• Swap (↔ icon below) - swap input and output content
Output panel (right side)
The right panel displays conversion results. The label changes based on mode -
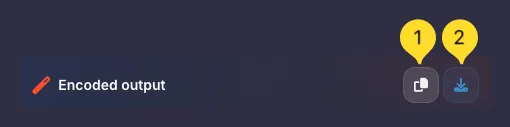
• In Text → Entities mode - Encoded output
• In Entities → Text mode - Decoded text
Header buttons (top right of panel):
• Copy (clipboard icon) - copy result to clipboard
• Download (download icon) - open export modal
Options bar (bottom left)
Below the panels, you'll find checkbox options. These differ by mode -
Text → Entities mode:
• Auto-convert
• Sync scroll
• Named entities
Entities → Text mode:
• Auto-convert
• Sync scroll
Note: "Named entities" option only appears in Text → Entities mode
Statistics (bottom right)
Three counters track your conversion:
• CHARS: total characters in input
• ENTITIES: number of HTML entities found/created
• CONVERTED (orange) - conversion percentage
Favorites (top right)
The heart icon in the top right corner lets you add this tool to your favorites for quick access from the homepage.
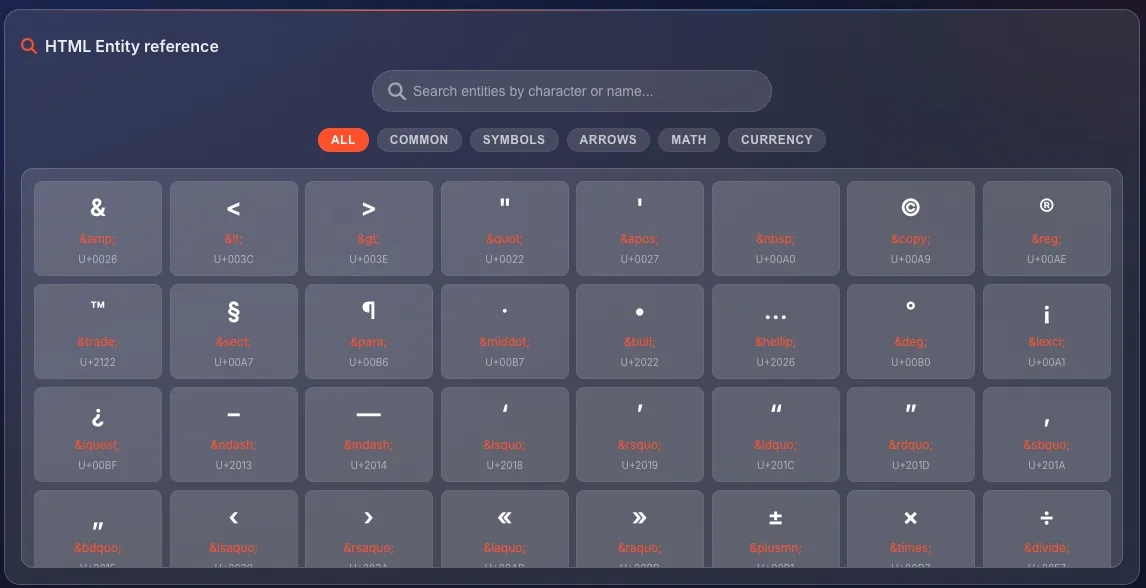
HTML Entity reference (below main interface)
Scroll down to find the HTML Entity reference section - a searchable table of common HTML entities organized by category. This is a built-in cheat sheet for quick entity lookup. Click any entity card to copy it to your clipboard.
Text → Entities mode Encode
The Text → Entities mode converts regular text into HTML-safe entities. This is the encoding direction - use it when preparing text for HTML display.
When to use this mode
Use Text → Entities when:
• Preparing user-generated content for web display
• Writing code examples that should show as text, not execute
• Adding special characters to HTML (©, ™, €)
• Sanitizing input to prevent XSS attacks
• Embedding quotes or angle brackets in HTML attributes
How it works
The encoder scans your text and replaces characters that have special meaning in HTML:
• < becomes <
• > becomes >
• & becomes &
• " becomes "
• ' becomes ' or '
Special characters like © become © (if Named entities is on) or © (numeric).
Named entities option
When Named entities checkbox is checked (only available in this mode):
• Common symbols use readable names: ©, €, ™
• Easier to read and edit in source code
When unchecked:
• Uses numeric codes: ©, €, ™
• Works universally with all characters
Input panel label
In this mode, the left panel is labeled Input text: enter your plain text here that needs to be encoded for HTML.
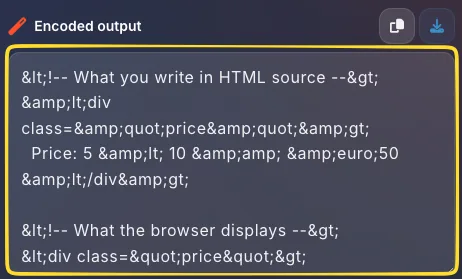
Output panel label
The right panel is labeled Encoded output: this shows your text converted to HTML entities, ready to copy into your HTML source code.
Entities → Text mode Decode
The Entities → Text mode converts HTML entities back to readable plain text. This is the decoding direction - use it when you need to read or edit encoded content.
When to use this mode
Use Entities → Text when:
• Reading HTML source code with many entities
• Editing content that was previously encoded
• Extracting text from HTML for other purposes
• Debugging entity encoding issues
• Converting encoded emails or documents back to readable form
How it works
The decoder recognizes all entity formats and converts them to actual characters:
• < becomes <
• > becomes >
• & becomes &
• © becomes ©
• € becomes €
• € becomes €
All three formats (named, decimal, hex) are fully supported.
No Named entities option
Notice that the Named entities checkbox is NOT available in decode mode. This option only makes sense when encoding (choosing between © and ©). When decoding, both formats produce the same © character.
Input panel label
In this mode, the left panel is labeled HTML Entities: enter your encoded text containing entities like &, <, © here.
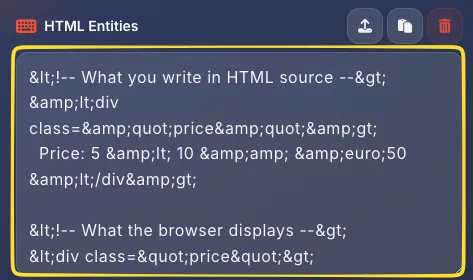
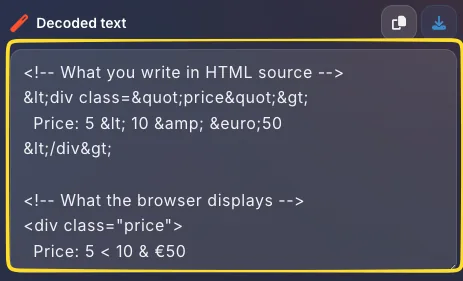
Output panel label
The right panel is labeled Decoded text: this shows the readable plain text after converting all entities to their actual characters.
&lt; instead of <, or &amp; instead of &, the text was double-encoded. You may need to decode twice to get the original text.How to convert
Converting between text and HTML entities is simple. Follow these steps for a successful conversion:
Select conversion mode
Click the appropriate mode button in the Conversion mode panel:
• Text → Entities: to encode text for HTML
• Entities → Text: to decode entities to readable text
The active mode is visually highlighted.
Enter your input
You have three ways to add input:
• Type directly: click in the input area and type or paste
• Upload a file: click the upload icon or drag & drop a file (TXT, HTML, JSON, XML)
• Paste from clipboard: click the paste icon
Conversion happens
If Auto-convert is enabled (default), conversion happens instantly as you type or paste.
If Auto-convert is off, click the CONVERT button to process your input.
Copy or download result
Once you have your result:
• Click the Copy icon on the output panel to copy to clipboard
• Click the Download icon to open the export modal with more options
A notification confirms successful actions.
Swap if needed
Made a mistake? Click the Swap button (⇄) between the panels to exchange input and output. This is useful for quick back-and-forth conversions or to reverse your work.
Input panel actions
The input panel (left side) has several action buttons in its header. Here's what each button does:
Upload button
Click the cloud upload icon to open a file picker. Select a file to load its contents into the input area.
Supported formats:
• TXT - Plain text files
• HTML - HTML documents
• JSON - JSON data files
• XML - XML documents
You can also drag and drop files directly onto the drop zone.
Paste button
Click the clipboard icon to paste content from your clipboard directly into the input area. This is equivalent to Ctrl+V / ⌘+V but works with a single click.
Useful when you've copied text from another application and want to quickly convert it.
Clear button
Click the red trash icon to instantly clear all content from the input area. This also clears the output and resets the statistics counters.
Use this to start fresh with a new conversion.
Drop zone
The main input area shows Drop files here or start typing when empty. You can:
• Click anywhere in the area to start typing
• Drag a file from your desktop and drop it here
• The format badges (TXT, HTML, JSON, XML) indicate supported file types
Output panel actions
The output panel (right side) displays your conversion results and provides options to use them. Here's what each button does:
Copy button
Click the clipboard icon to copy the entire output to your clipboard. A notification confirms the copy was successful.
The copied content is ready to paste into your HTML editor, code file, or any other application.
Download button
Click the download icon to open the Export modal with multiple export options:
• Download as TXT or HTML file
• Copy results to clipboard
• Get a shareable link
See the Export modal section for full details.
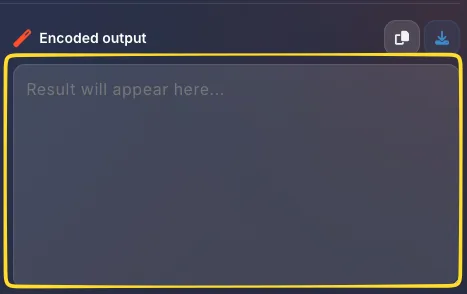
Output display
The output area shows "Result will appear here..." when empty. After conversion:
• Encoded entities appear in the Text → Entities mode
• Decoded plain text appears in Entities → Text mode
The output is read-only but fully selectable for manual copying.
Conversion options
Below the input/output panels, you'll find checkbox options that control how the conversion behaves. Note that available options differ by mode.
Auto-convert
When checked (default) - Conversion happens automatically as you type or paste. Every keystroke updates the output in real-time.
When unchecked: You must click the CONVERT button to process your input. Useful for very large inputs where real-time conversion might be slow.
Available in both modes.
Sync scroll
When checked (default) - Scrolling in one panel automatically scrolls the other panel to the same position. This helps you compare input and output side-by-side.
When unchecked: Each panel scrolls independently.
Available in both modes.
Highlight changes
When checked: Converted characters are highlighted in the output, making it easy to see exactly what was encoded or decoded.
When unchecked: Output appears without highlighting.
Available in Text → Entities mode only! Helps you quickly identify which characters required conversion.
Named entities
When checked: Uses readable entity names where available (©, €, ™). Easier to read and maintain in source code.
When unchecked: Uses numeric codes only (©, €, ™). Works with any character, including those without named entities.
Available in Text → Entities mode only! This option does not appear in decode mode.

©) are human-readable and great for common symbols. Numeric entities (©) are more universal - they work for any Unicode character, even obscure ones without official names.Export modal Export
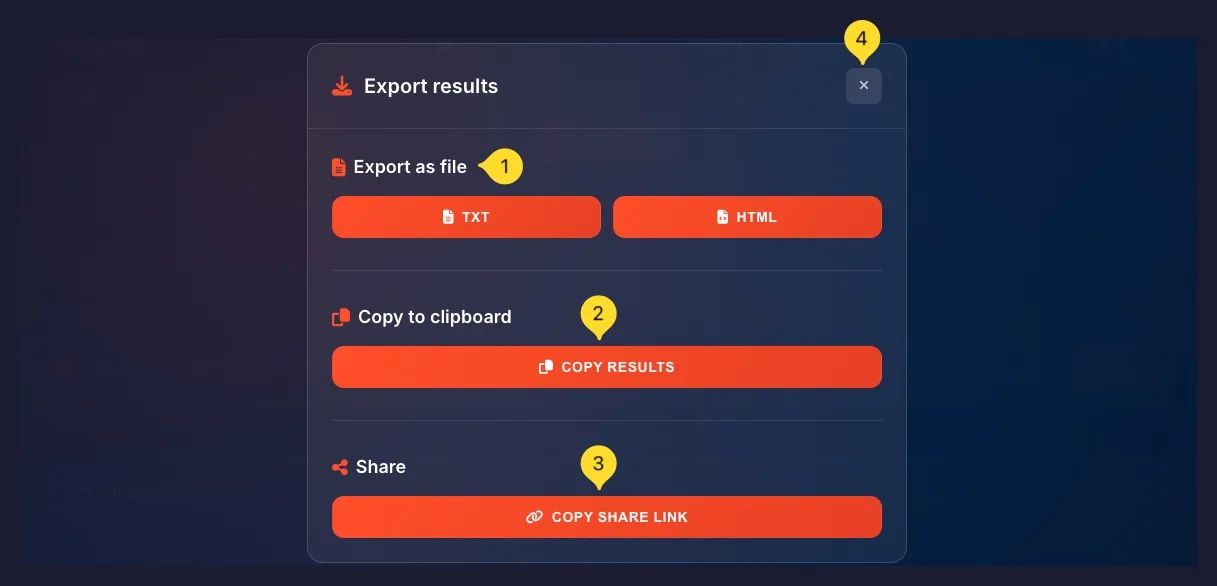
Click the Download button on the output panel to open the Export modal. This provides multiple ways to save and share your converted content.
Export as file
Download your results as a file:
• TXT: Plain text file, universal compatibility
• HTML: HTML file with proper encoding, ready for web use
Click a button to instantly download the file to your device.
Copy to clipboard
COPY RESULTS: Click to copy the entire output to your clipboard. Same as the copy button on the output panel, but accessible from the modal.
A notification confirms the successful copy.
Share
COPY SHARE LINK: Creates a shareable URL that contains your input text encoded in the link. When someone opens this link, they'll see the tool with your content pre-loaded.
Perfect for sharing examples with teammates or asking for help online.
Close modal
Click the X button in the top right corner to close the export modal and return to the main interface.
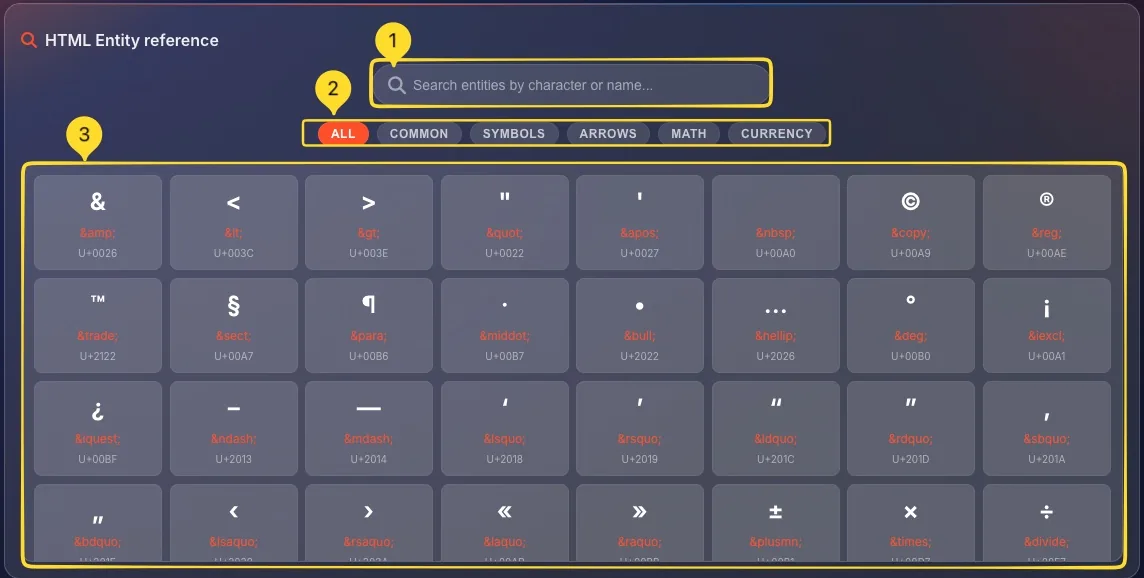
HTML Entity reference Built-in
Scroll down below the main converter to find the HTML Entity reference: a comprehensive, searchable table of common HTML entities. This is your built-in cheat sheet for quick entity lookup.
Search bar
At the top of the reference section, type in the search bar to find entities:
• Search by character: type © to find the copyright symbol
• Search by entity name: type "copy" or "amp"
• Search by description: type "arrow" or "quote"
Results filter in real-time as you type.
Category tabs
Filter entities by category using the tab buttons:
• ALL: show all entities (highlighted when active)
• COMMON: frequently used entities (< > & " ' etc.)
• SYMBOLS: miscellaneous symbols (© ® ™ § ¶ etc.)
• ARROWS: directional arrows (← → ↑ ↓ etc.)
• MATH: mathematical operators (× ÷ ± ≠ etc.)
• CURRENCY: currency symbols (€ £ ¥ ¢ etc.)
Entity cards
Each entity is displayed in a card showing three pieces of information:
• Large character at the top - the actual rendered symbol
• Entity name (orange) in the middle - e.g., &, <, ©
• Unicode code at the bottom - e.g., U+0026, U+003C, U+00A9
Click any card to instantly copy the entity name (e.g., ©) to your clipboard. A Copied badge appears briefly to confirm.
Examples from reference
Some entities you'll find in the reference:
• & → & (U+0026) - Ampersand
• < → < (U+003C) - Less than
• > → > (U+003E) - Greater than
• © → © (U+00A9) - Copyright
• ® → ® (U+00AE) - Registered trademark
• ™ → ™ (U+2122) - Trademark
• € → € (U+20AC) - Euro sign
Statistics counters
At the bottom right of the interface, three counters track your conversion in real-time. These help you understand the scope and effectiveness of the conversion.
CHARS counter
Shows the total number of characters in your input text.
This counts all characters including spaces, newlines, and special characters before any conversion takes place.
ENTITIES counter
In Text → Entities mode - Shows how many entities were created during encoding. If you input <div> (5 chars), it creates 2 entities (< and >).
In Entities → Text mode - Shows how many entities were found and decoded in your input.
CONVERTED counter
Shows the conversion percentage with an orange background for emphasis.
• 0%: No conversion happened (no special characters found)
• Higher %: More of your input required conversion
Example: If 10 out of 100 characters needed entity conversion, this shows 10%.

Common entities list
Here are the most frequently used HTML entities organized by category. Memorizing these will save you time:
< (<)•
> (>)•
& (&)•
" (")•
' (')These MUST be encoded when displaying in HTML to avoid breaking your markup.
© (©)•
® (®)•
™ (™)Common legal symbols for copyright notices and brand protection.
€ (€)•
£ (£)•
¥ (¥)•
¢ (¢)•
$ ($)International currency symbols for e-commerce and financial content.
× (×)•
÷ (÷)•
± (±)•
≠ (≠)•
≤ (≤)•
≥ (≥)Mathematical symbols for equations and technical documentation.
← (←)•
→ (→)•
↑ (↑)•
↓ (↓)•
↔ (⇄)Directional arrows for navigation, instructions, and diagrams.
(non-breaking)•
  (en space)•
  (em space)•
– (–)•
— (—)Typographic control for professional text formatting.
What are HTML entities?
HTML entities are special codes that represent characters in HTML documents. They're essential because some characters have special meaning in HTML or can't be typed directly on a keyboard. Understanding entities is fundamental for web development.
Why entities exist
In HTML, certain characters have special meanings:
• < and > define HTML tags
• & starts entity codes
• " and ' delimit attribute values
If you want to display <div> as visible text (not as an actual HTML tag), you must write <div>. Otherwise, the browser interprets it as a real element.
Entity formats
Entities can be written in three formats:
• Named entities: & (ampersand), < (less than), © (copyright)
• Decimal numeric: & (ampersand by decimal number)
• Hexadecimal numeric: & (ampersand in hex)
All three formats produce the same result - the ampersand character &.
The ampersand rule
Every HTML entity:
• Starts with & (ampersand)
• Ends with ; (semicolon)
This is how browsers recognize entities. The ampersand itself must be written as & to avoid confusion with entity start sequences.
When to use entities
Use HTML entities for:
• HTML reserved characters: < > & " '
• Special symbols: © ® ™ € £ ¥
• Characters not on keyboard: é ñ ü ß
• User input on web pages: ALWAYS encode to prevent XSS attacks
• Non-breaking spaces: to prevent line breaks
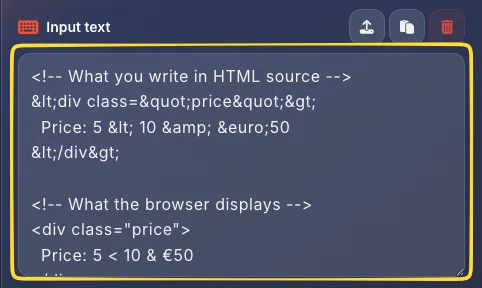
<!-- What you write in HTML source -->
<div class="price">
Price: 5 < 10 & €50
</div>
<!-- What the browser displays -->
<div class="price">
Price: 5 < 10 & €50
</div>Security considerations
<script>alert('XSS')</script> in your application's forms. If you see an alert popup, you have a vulnerability. If you see the literal text displayed, you're protected.Common use cases
Here are real-world scenarios where HTML entity encoding is essential:
Tips & Best practices
© is much easier to understand in source code than ©. Enable the Named entities option when you want maintainable, readable HTML code.< > & " ' - these handle 99% of everyday encoding needs for web development.Frequently asked questions
©) are human-readable but limited to defined names. Numeric entities (© decimal or © hex) can represent ANY Unicode character. Both display identically in browsers. Use named for common symbols, numeric for obscure characters.
© and © produce the same © character, so there's no choice to make - you always get the actual character regardless of how it was encoded.
& becomes &, and then that gets encoded again, & becomes &amp;. Switch to Entities → Text mode and decode twice to fix this. Check your pipeline for multiple encoding steps.
(non-breaking space) IS a space - it just prevents line breaks at that position. It's invisible like a regular space but keeps words together. Use it between numbers and units (100 km) or in names that shouldn't wrap.
\u00A9 for ©. Or if your JS file is UTF-8 encoded, you can use the actual character directly: const copyright = '©';
%20 for space, %26 for &. HTML encoding uses for non-breaking space, & for &. They're completely different systems. Use our URL Encoder tool for URLs, this tool for HTML content.