Overview
The Image Resizer is a powerful bulk image processing tool that resizes, crops, rotates, and watermarks images. It supports 10 input formats (JPG, PNG, WEBP, AVIF, GIF, BMP, TIFF, ICO, HEIC, HEIF) and 8 output formats. Choose from 3 resize methods: exact dimensions, percentage scaling, or 12 social media platform presets. Add global watermarks (text or logo) to all images, or apply individual watermarks per image. All processing happens in your browser - no uploads to any server.
Interface overview
The Image Resizer has a comprehensive interface with multiple panels for configuring resize settings, output options, and watermarks.
Drop zone (initial state)
Before adding images, you see a large drop zone for uploading files. This includes the upload icon, SELECT FILES button, supported format badges (JPG, PNG, WEBP, AVIF, GIF, BMP, TIFF, ICO, HEIC, HEIF), and capability badges (Multiple files, Any size).
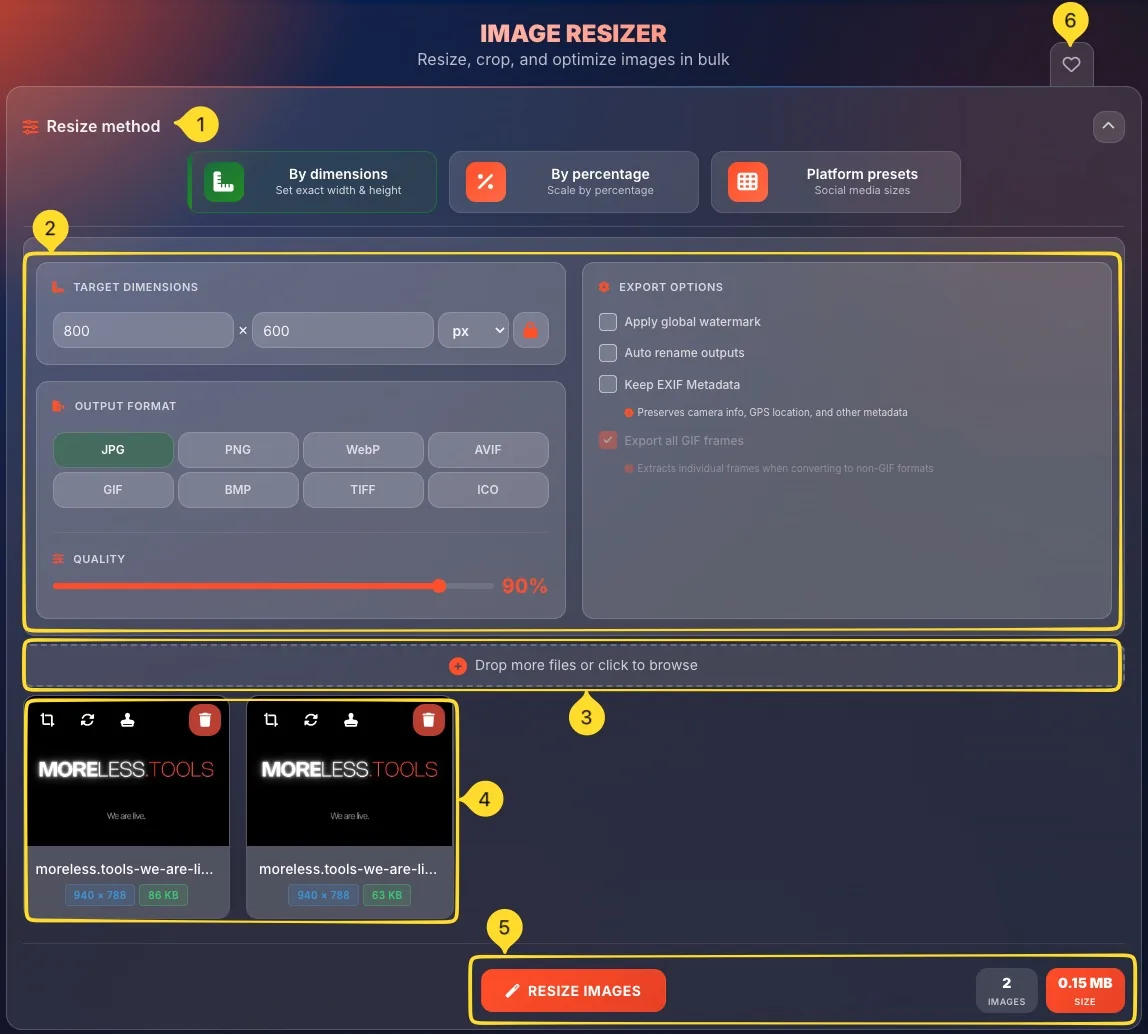
Resize method selector
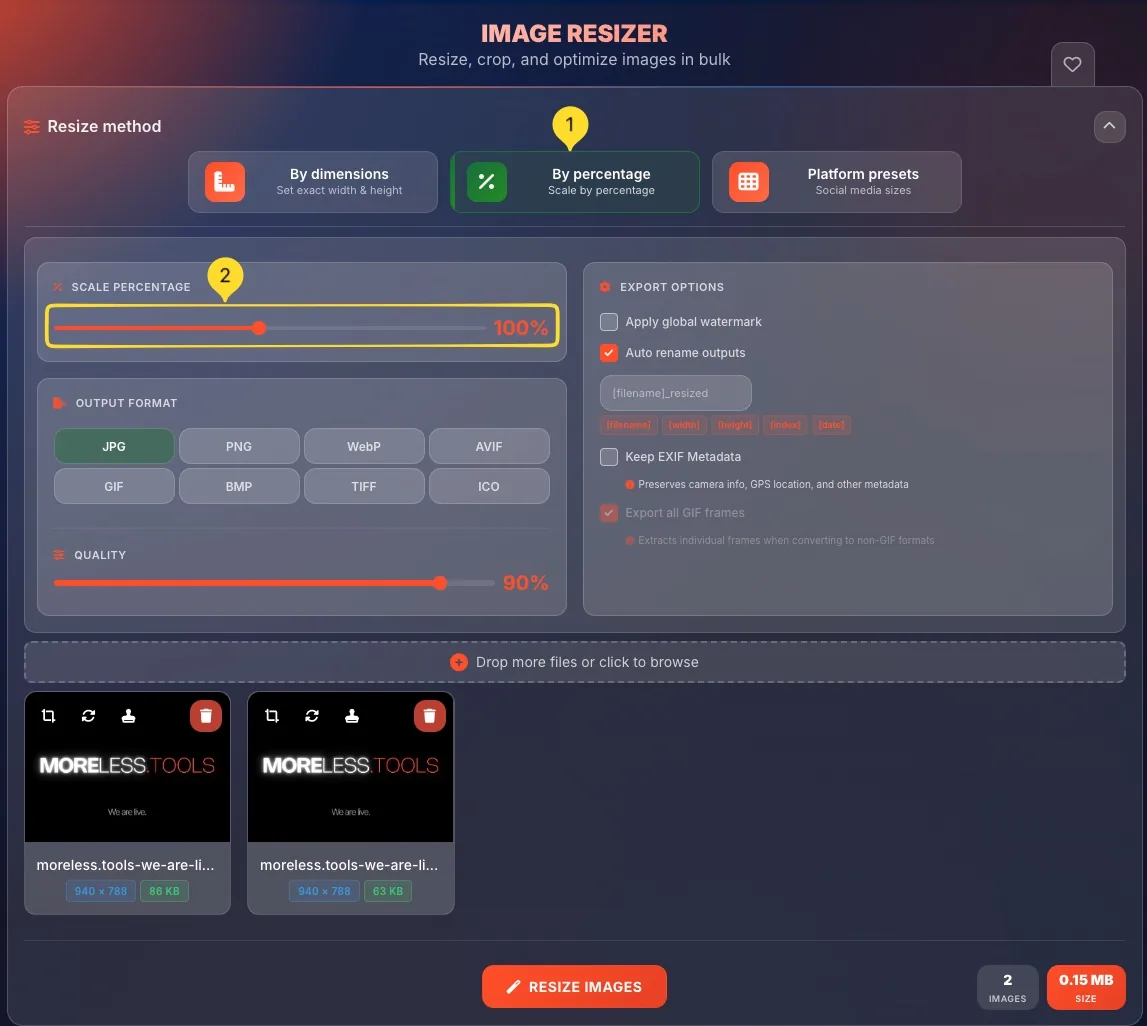
After adding images, the Resize method section appears with 3 mode buttons:
• By dimensions: set exact width & height
• By percentage: scale by percentage
• Platform presets: social media sizes
Settings panels
Below the resize method, two main panels:
• Left panel: TARGET DIMENSIONS (or SCALE PERCENTAGE or PLATFORM PRESETS) + OUTPUT FORMAT
• Right panel: EXPORT OPTIONS with watermark settings
Add more files bar
A bar showing Drop more files or click to browse allows adding additional images to your batch at any time.
Image gallery
Below the settings, thumbnail previews of all uploaded images.
Each has action buttons: Crop, Rotate, Watermark, Download, and Delete.
Bottom bar
At the very bottom:
• RESIZE IMAGES button: processes all images with current settings
• Statistics: shows total images, original size, and estimated output size
Favorites tab
On the left sidebar (desktop) or bottom bar (mobile), a heart icon lets you add this tool to your favorites for quick access from the Command Palette.
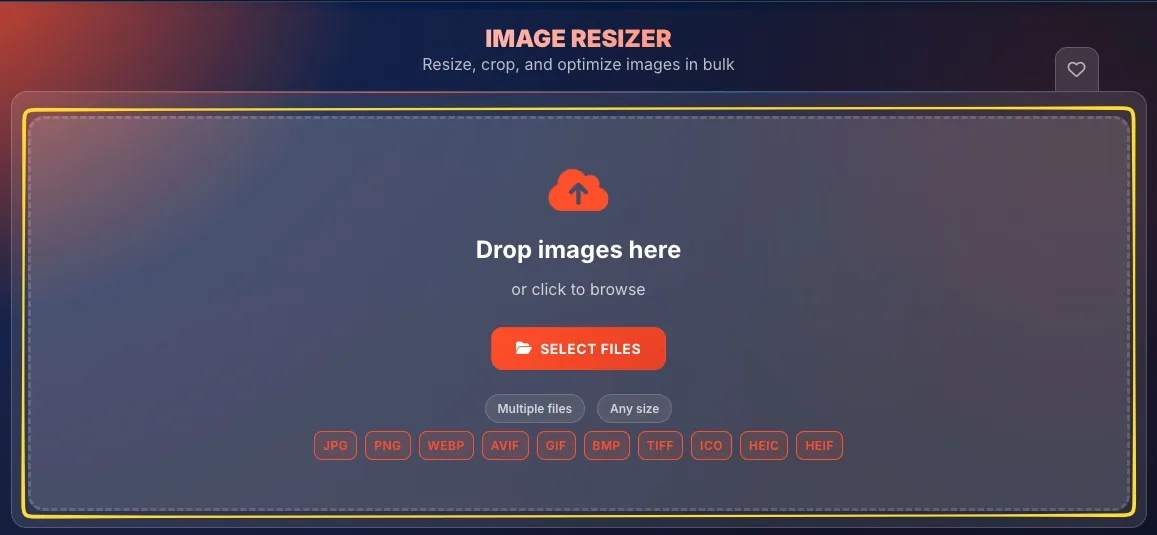
Drop zone & input 10 Formats
The initial drop zone accepts multiple images in various formats. You can drag and drop or click to browse.
Drop zone elements
The drop zone displays:
• Upload icon
• Drop images here: main instruction text or click to browse
• SELECT FILES button: opens file picker
Info badges
Two badges indicate capabilities:
• Multiple files: you can upload many images at once
• Any size: no file size restrictions
Supported input formats
10 input formats shown as badges at the bottom:
• JPG: most common photo format
• PNG: graphics with transparency
• WEBP: modern web format
• AVIF: newest efficient format
• GIF: animated images
• BMP: bitmap images
• TIFF: high-quality/print
• ICO: icon files
• HEIC: iPhone photos
• HEIF: high efficiency format
Upload methods
Three ways to add images:
• Drag and drop: drag files from your computer onto the drop zone
• Click SELECT FILES: opens your system file picker
• Click anywhere in the drop zone - also opens file picker
Add more images
After initial upload, a Drop more files or click to browse bar appears below the settings. Use this to add additional images to your batch at any time.
3 resize methods Mode Selection
The Resize method section offers three different approaches to resizing your images. Each method shows different controls below.
By dimensions
By dimensions button:
• Description: "Set exact width & height"
• Shows TARGET DIMENSIONS panel below
• Enter specific pixel values for width and height
• Best for: exact size requirements, web specifications
By percentage
By percentage button:
• Description: "Scale by percentage"
• Shows SCALE PERCENTAGE panel with slider
• Scale images up or down by percentage (e.g., 50%, 200%)
• Best for: proportional scaling, quick size reduction
Platform presets
Platform presets button:
• Description: "Social media sizes"
• Shows PLATFORM PRESETS grid with 12 options
• Pre-configured sizes for Instagram, Facebook, Twitter, etc.
• Best for: social media content creators
Selection indicator
The currently selected method has a highlighted border around its button. Only one method can be active at a time. Click any button to switch methods.
Collapse/expand
The Resize method section has a collapse arrow (^) in the top right. Click to collapse the entire section for more screen space.
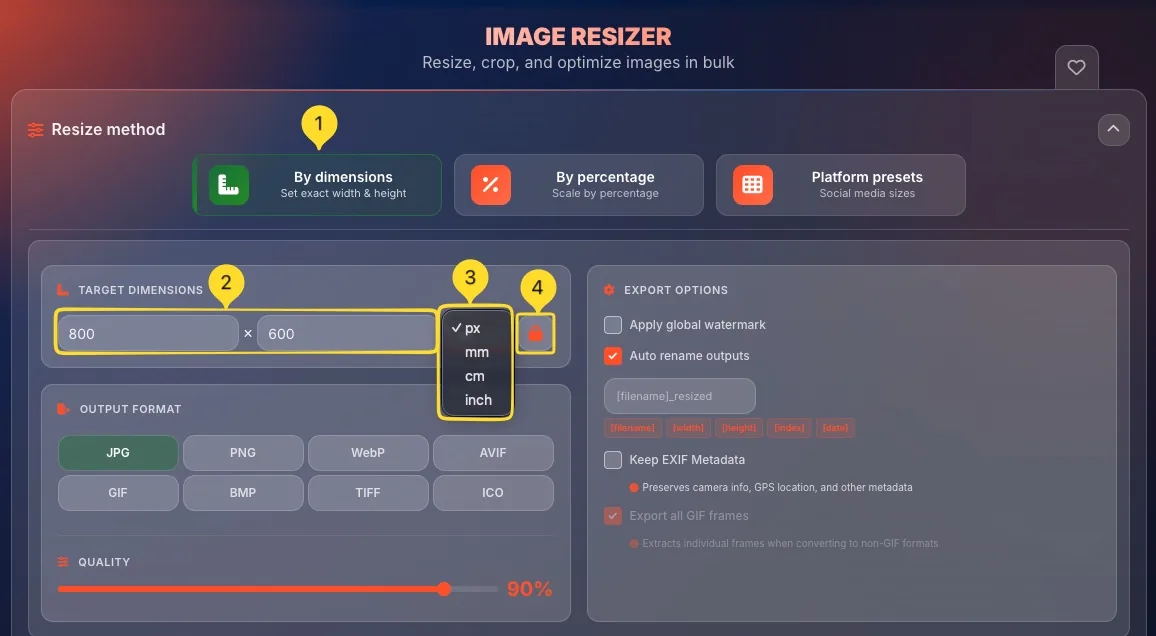
By dimensions Exact Size
The TARGET DIMENSIONS panel lets you specify exact pixel dimensions for your resized images.
Panel header
The panel shows TARGET DIMENSIONS with a ruler icon in orange.
Width input
The first input field sets the width:
• Enter a number (e.g., "800")
• Value represents pixels by default
• Leave empty to auto-calculate from height (with aspect lock)
Multiply symbol
An × symbol separates width and height, indicating "width by height" (e.g., 800 × 600).
Height input
The second input field sets the height:
• Enter a number (e.g., "600")
• Value represents pixels by default
• Leave empty to auto-calculate from width (with aspect lock)
Unit selector
A dropdown next to height lets you select the unit:
• px: pixels (default, most common)
• mm: millimeters
• cm: centimeters
• inch: inches
Aspect ratio lock
The padlock button toggles aspect ratio lock:
• Locked: changing width auto-calculates height (and vice versa) to maintain proportions
• Unlocked: width and height are independent (may cause distortion)
Locked by default to prevent accidental distortion.
By percentage Scale
The SCALE PERCENTAGE panel provides a simple slider to resize images by percentage.
Panel header
The panel shows SCALE PERCENTAGE with a percent icon.
Percentage slider
A horizontal slider spans the panel:
• Drag left to reduce size (minimum 10%)
• Drag right to increase size (maximum 200%)
• The slider handle (orange dot) shows current position
Percentage display
The current percentage is shown in orange text on the right side (e.g., "100%"). This updates as you drag the slider.
How percentage works
The percentage is relative to the original image size:
• 100%: original size (no change)
• 50%: half the original size
• 200%: double the original size (maximum)
• 10%: one-tenth size (minimum)
Maintains proportions
Percentage scaling always maintains aspect ratio. A 1000×500 image at 50% becomes 500×250. No distortion possible.
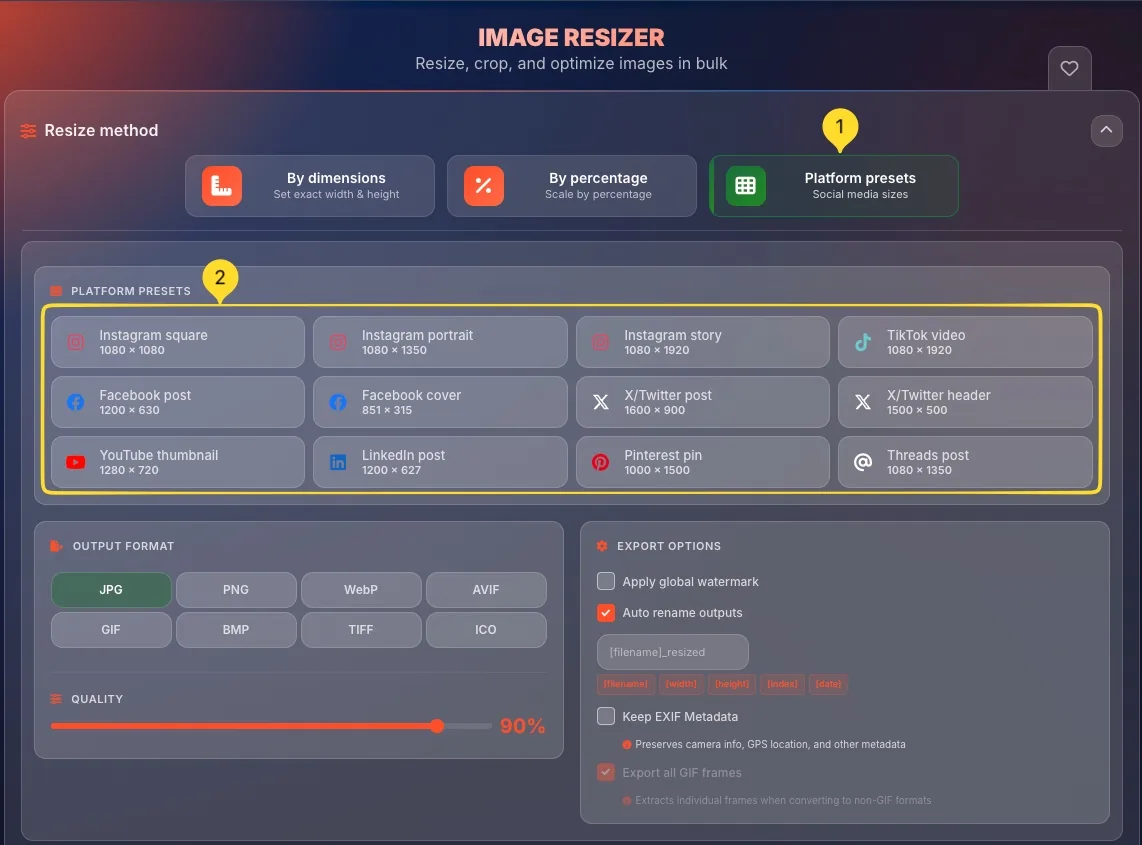
Platform presets 12 Sizes
The PLATFORM PRESETS panel offers 12 pre-configured sizes for popular social media platforms. One click sets the perfect dimensions.
Panel header
The panel shows PLATFORM PRESETS with a grid icon in orange.
Instagram presets
• Instagram square: 1080 × 1080
• Instagram portrait: 1080 × 1350
• Instagram story: 1080 × 1920
TikTok preset
• TikTok video: 1080 × 1920
Vertical full-screen format for short-form video content.
Facebook presets
• Facebook post: 1200 × 630
• Facebook cover: 851 × 315
X/Twitter presets
• X/Twitter post: 1600 × 900
• X/Twitter header: 1500 × 500
YouTube preset
• YouTube thumbnail: 1280 × 720
Standard 16:9 HD thumbnail size.
LinkedIn preset
• LinkedIn post: 1200 × 627
Pinterest preset
• Pinterest pin: 1000 × 1500
Tall vertical format optimized for Pinterest feed.
Threads preset
• Threads post: 1080 × 1350
Vertical portrait format optimized for Threads feed.
Preset selection
Click any preset button to select it. The button highlights when selected. Your images will be resized to those exact dimensions.
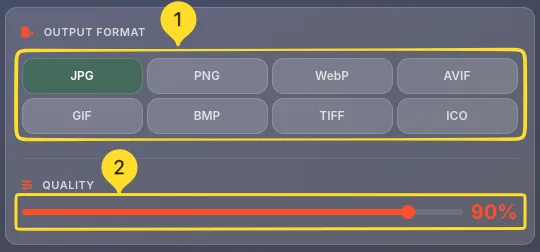
Output format 8 Formats
The OUTPUT FORMAT panel lets you choose the file format for your resized images. Eight formats are available.
Panel header
The panel shows OUTPUT FORMAT with an export icon in orange.
Format grid
8 format buttons arranged in 2 rows of 4:
• Row 1: JPG, PNG, WebP, AVIF
• Row 2: GIF, BMP, TIFF, ICO
JPG format
JPG (JPEG):
• Best for: photographs, complex images
• Lossy compression (smaller files)
• No transparency support
• Universal compatibility
PNG format
PNG (selected by default):
• Best for: graphics, screenshots, logos
• Lossless compression (larger files)
• Supports transparency
• Excellent quality
WebP format
WebP:
• Best for: web images
• Excellent compression (smaller than JPG/PNG)
• Supports transparency and animation
• Modern browser support
AVIF format
AVIF:
• Best for: cutting-edge web optimization
• Superior compression (smallest files)
• Supports transparency
• Newer browser support required
GIF format
GIF:
• Best for: simple animations, low-color graphics
• Supports animation
• Limited to 256 colors
• Transparency support (1-bit)
BMP, TIFF, ICO
Additional formats:
• BMP: uncompressed bitmap (large files)
• TIFF: high quality for print/archival
• ICO: favicon/icon format for websites
Selection
Click any format button to select it. The selected format is visually highlighted. All output images will use this format.
Export options Right Panel
The EXPORT OPTIONS panel on the right side contains settings for watermarks, file naming, metadata, and GIF handling.
Panel header
The panel shows EXPORT OPTIONS with a gear icon in orange.
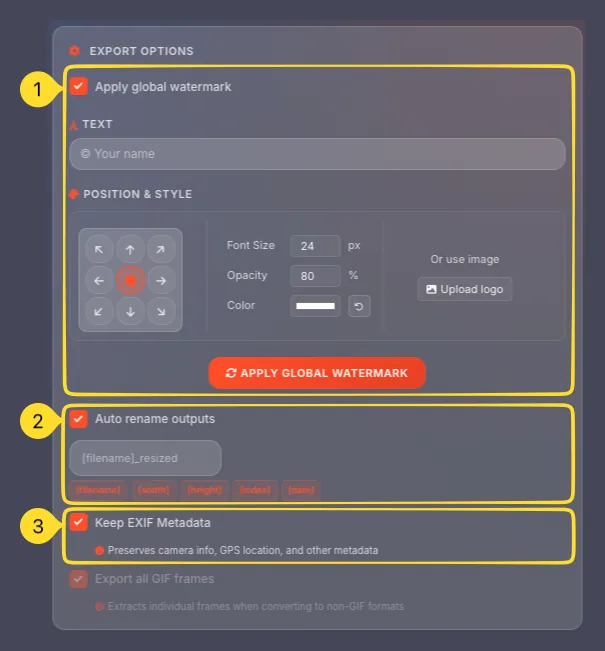
Global watermark section
At the top:
• Apply global watermark checkbox
• When enabled, shows TEXT and POSITION & STYLE settings
• Watermark is applied to ALL images in the batch
Auto rename outputs
Auto rename outputs checkbox (checked by default):
• Pattern field showing: [filename]_resized
• Variable tags available: [filename], [width], [height], [index], [date]
• Automatically renames output files based on pattern
Rename variables explained
Click any variable tag to add it to the pattern:
• [filename]: original filename without extension
• [width]: output width in pixels
• [height]: output height in pixels
• [index]: sequential number (1, 2, 3...)
• [date]: current date
Keep EXIF Metadata
Keep EXIF Metadata checkbox (unchecked by default):
• Description: "Preserves camera info, GPS location, and other metadata"
• When checked: original metadata is preserved
• When unchecked: metadata is stripped (recommended for privacy)
Export all GIF frames
Export all GIF frames checkbox (checked by default):
• Description: "Extracts individual frames when converting to non-GIF formats"
• When checked: animated GIFs export each frame as separate image
• When unchecked: only first frame is exported
Global watermark Batch Watermark
The global watermark settings apply a watermark to ALL images in your batch. You can use text, an image logo, or both.
Enable global watermark
Check Apply global watermark to reveal the watermark settings. When enabled, the APPLY GLOBAL WATERMARK button becomes active.
TEXT section
The TEXT section:
• Input field with placeholder: "Your name"
• Enter your watermark text (e.g., your name, website, copyright)
• Leave empty if using only logo watermark
POSITION & STYLE section
The POSITION & STYLE section contains positioning and styling options.
Position grid
A 3×3 grid of position buttons (9 positions):
• Top row: top-left, top-center, top-right
• Middle row: center-left, center (default, orange), center-right
• Bottom row: bottom-left, bottom-center, bottom-right
Click any position to place your watermark there.
Font Size
Font Size setting:
• Input field showing size in pixels (default: 24)
• "px" label indicates pixels
• Adjust for larger or smaller watermark text
Opacity
Opacity setting:
• Input field showing percentage (default: 80)
• "%" label indicates percentage
• 100% = fully visible, 0% = invisible
• 50-80% is typical for subtle watermarks
Color
Color setting:
• Color swatch (default: white/light)
• Click to open color picker
• Reset button restores default color
• White or black work best on most images
Logo option
Or use image section on the right:
• Upload logo button
• Click to upload an image file as watermark
• Logo replaces or supplements text watermark
• Useful for brand logos
Apply button
APPLY GLOBAL WATERMARK button:
• Click to apply watermark settings to all images
• Updates preview thumbnails
• Settings are saved for the batch
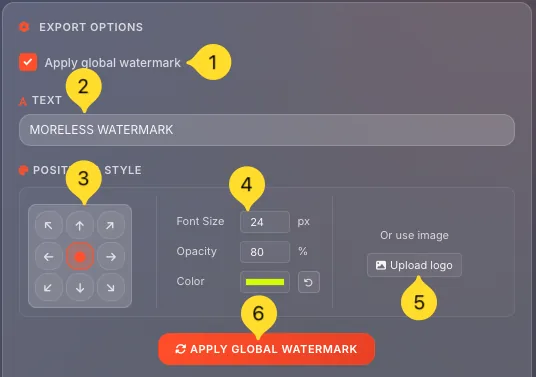
Image gallery & actions Per-Image
At the bottom of the interface, thumbnail previews show all uploaded images. Each thumbnail has action buttons for individual editing.
Thumbnail display
Each uploaded image appears as a thumbnail card showing:
• Preview of the image
• Filename below (e.g., "IMG_2986.jpeg")
• Action buttons overlaid on top
Action buttons
Four action buttons appear on each thumbnail (left to right):
• Crop: open crop modal
• Rotate: open rotate modal
• Download: download this image
• Delete: remove from batch
Crop button
Click the crop icon to open the Crop image modal. Crop this specific image before resizing. Covered in detail in the Crop modal section.
Rotate button
Click the rotate icon to open the Rotate image modal. Rotate or flip this specific image. Covered in detail in the Rotate modal section.
Download button
Click the download icon to download this single image with current resize settings applied. Useful for downloading one image without processing the entire batch.
Delete button
Click the red trash icon to remove this image from the batch. The image is deleted immediately - no confirmation dialog. Other images remain.
Individual watermark
Some tools also include a watermark button per image to add individual watermarks separate from the global watermark. This allows customizing watermarks per image.

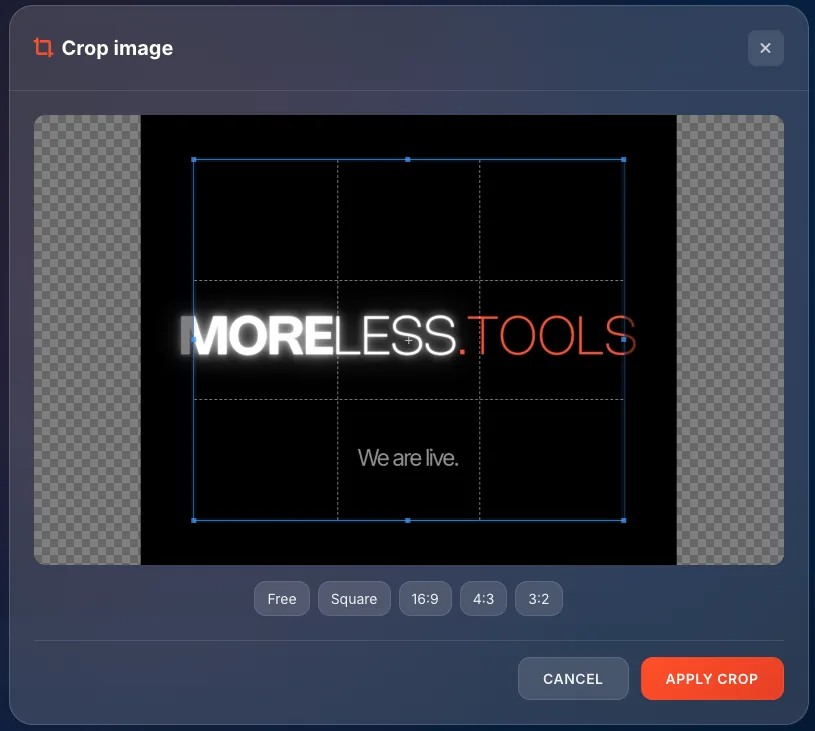
Crop modal Per-Image
The Crop image modal allows you to select and crop a specific area of an individual image before resizing.
Modal header
The modal shows Crop image with a crop icon. An X button in the top right closes without applying changes.
Image preview
The main area shows your image with a crop overlay:
• The selected area is fully visible
• Areas outside the selection are dimmed/checkered
• A rule of thirds grid (9 sections) helps with composition
Crop selection
The blue-bordered rectangle is your crop selection:
• Drag inside to move the selection
• Drag corners/edges to resize the selection
• Only the area inside will be kept
Aspect ratio buttons
5 aspect ratio buttons below the preview:
• Free: no constraint, any shape
• Square: 1:1 ratio (perfect square)
• 16:9: widescreen/video format
• 4:3: traditional photo format
• 3:2: DSLR photo format
Using aspect ratios
Click an aspect ratio to constrain the crop selection to that ratio. The selection maintains the ratio as you resize it. Click Free to remove constraints.
Action buttons
Two buttons at the bottom:
• CANCEL: close without cropping
• APPLY CROP: apply the crop and close
After cropping
Once you apply crop:
• The thumbnail updates to show the cropped version
• Resize settings are applied to the cropped area
• You can crop again if needed
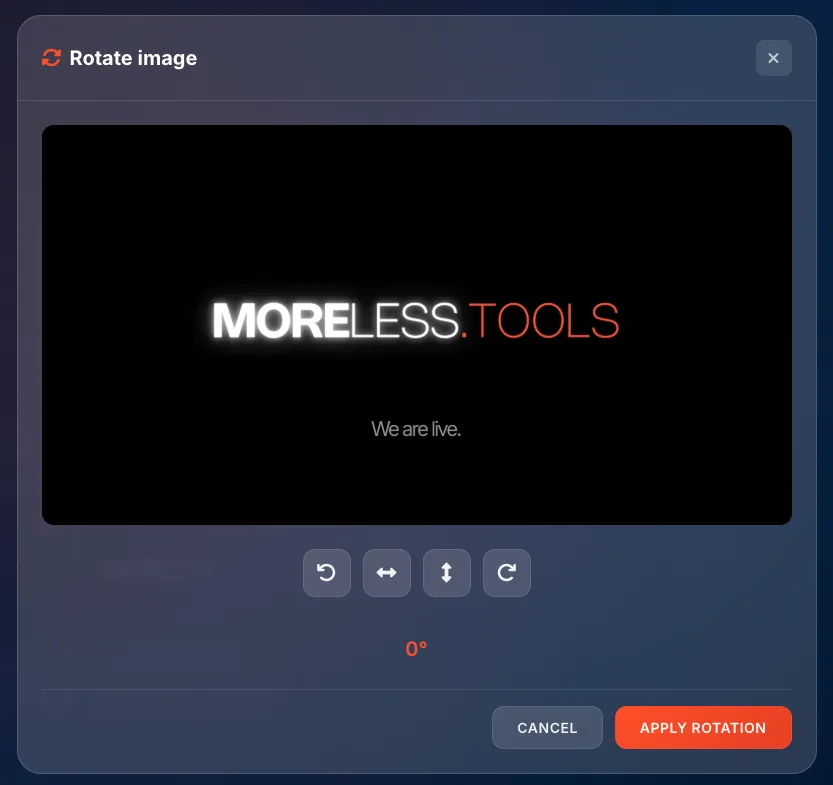
Rotate modal Per-Image
The Rotate image modal allows you to rotate and flip an individual image before resizing.
Modal header
The modal shows Rotate image title. An X button in the top right closes without applying changes.
Image preview
The main area shows your image with current rotation applied. Black bars may appear on sides to show the actual bounds.
Rotation buttons
4 buttons for rotation and flipping:
• Rotate left: rotate 90° left
• Flip horizontal: mirror horizontally
• Flip vertical: mirror vertically
• Rotate right: rotate 90° right
Current rotation display
Below the buttons, the current rotation angle is shown in orange (e.g., "0°"). This updates as you click rotation buttons.
Using rotation
Click rotation buttons to transform the image:
• Each rotate click adds/subtracts 90°
• Flips toggle on/off
• Preview updates immediately
• Combine rotations and flips as needed
Action buttons
Two buttons at the bottom:
• CANCEL: close without rotating
• APPLY ROTATION: apply transformation and close
After rotating
Once you apply rotation:
• The thumbnail updates to show the rotated version
• Resize settings are applied to the rotated image
• You can rotate again if needed
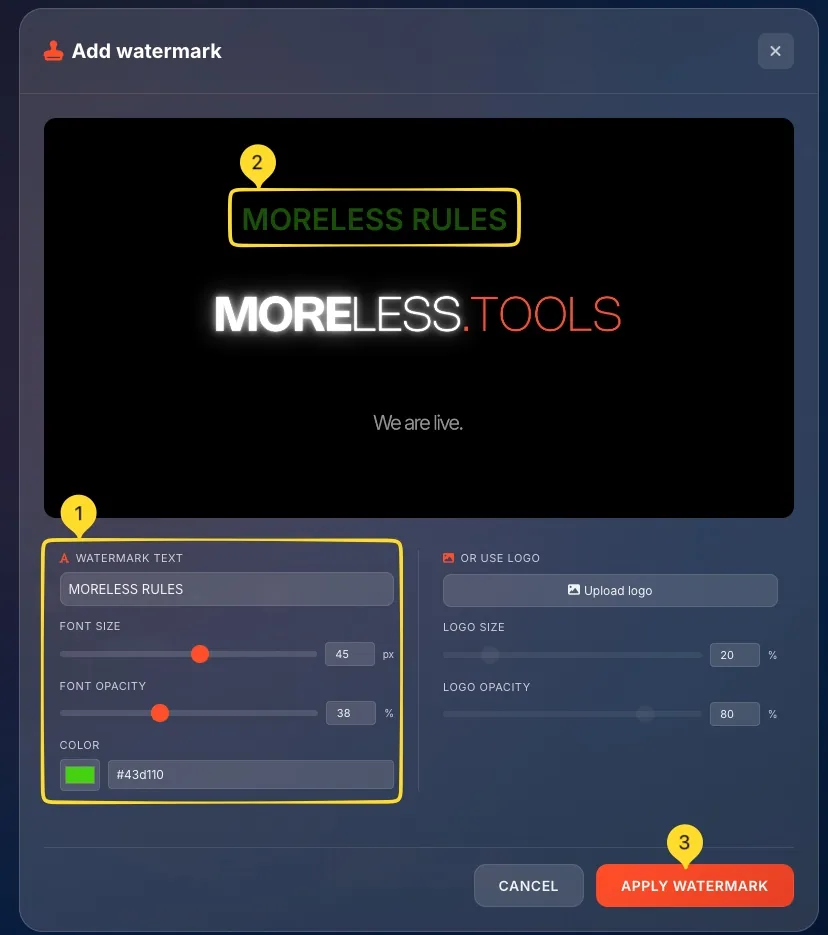
Individual watermark Per-Image
The Add watermark modal allows you to add a watermark to a single image, separate from the global watermark. This gives you per-image customization.
Modal header
The modal shows Add watermark with a stamp icon. An X button in the top right closes without applying.
Image preview
The main area shows your image with watermark preview. The watermark (text or logo) is displayed in real-time as you adjust settings. In the example, "Sample Watermark" appears centered on the image.
WATERMARK TEXT section
Left column:
• Text input field (e.g., "Sample Watermark")
• Enter your desired watermark text
• Preview updates as you type
Text styling
Below the text input:
• FONT SIZE: slider + input (e.g., 24 px)
• FONT OPACITY: slider + input (e.g., 80 %)
• COLOR: color swatch + hex input (e.g., #ffffff)
Sliders have orange handles for easy adjustment.
OR USE LOGO section
Right column: OR USE LOGO:
• Upload logo button - click to upload a logo image
• Use an image file instead of text
• Good for brand logos
Logo styling
Below the upload button:
• LOGO SIZE: slider + input (e.g., 20 %)
• LOGO OPACITY: slider + input (e.g., 80 %)
Size is percentage of image dimensions.
Action buttons
Two buttons at the bottom:
• CANCEL: close without applying
• APPLY WATERMARK: apply and close
Global vs Individual
Key difference:
• Global watermark: applies same watermark to ALL images
• Individual watermark: applies only to THIS specific image
Use individual when you need different text/position per image.