Overview
The PDF Merger combines multiple PDF files into a single document. It offers advanced features like page selection from each file, automatic page numbering, orientation unification, and drag-and-drop reordering. All processing happens locally in your browser - your files never leave your device.
Interface overview
The PDF Merger has a clean, organized interface. Here's what you'll find on the screen:
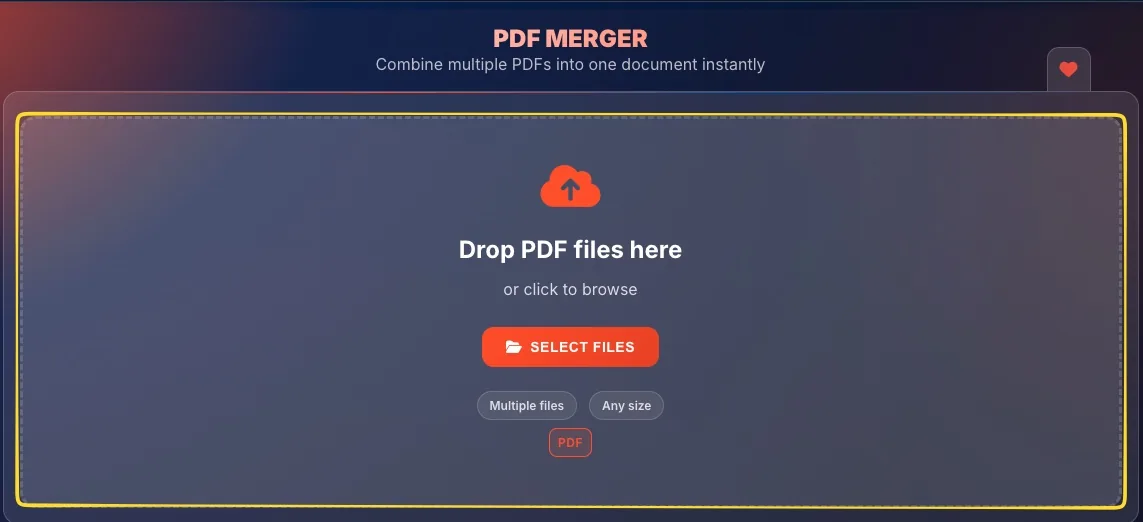
Drop zone (empty state)
When you first open the tool, you'll see a large drop zone with:
• Upload icon at the top
• Drop PDF files here heading or click to browse text
• SELECT FILES button (orange)
• Badges: Multiple files, Any size, PDF
Header section
After uploading files, the interface shows:
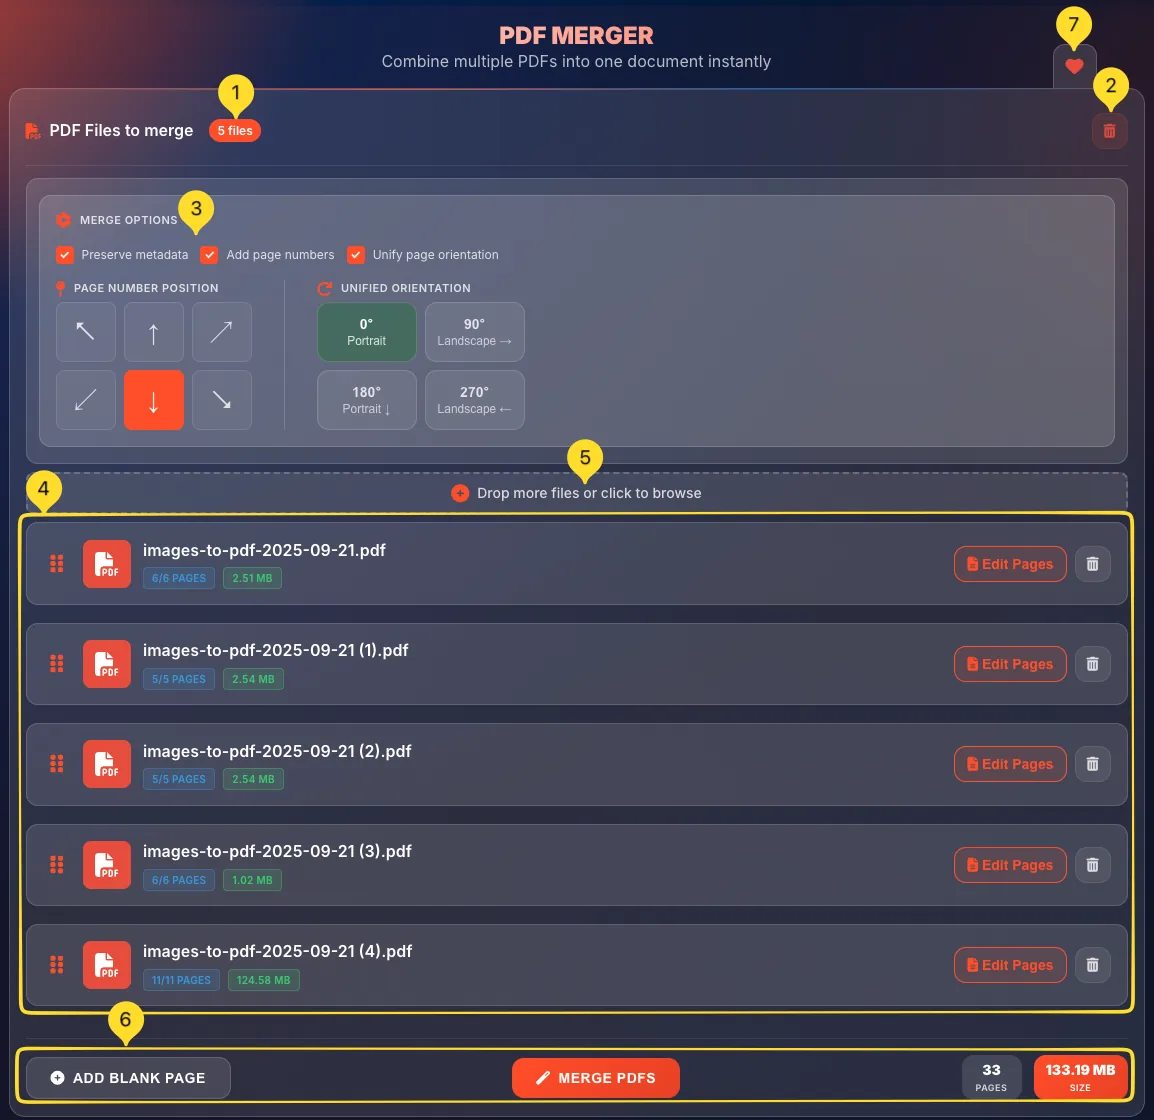
• "PDF Files to merge" title with a PDF icon
• File count badge (e.g., "3 files") showing how many PDFs are loaded
• Clear all button (trash icon) in the top-right corner to remove all files
Merge options panel
Below the header, you'll find the MERGE OPTIONS panel with three checkboxes:
• Preserve metadata: keep PDF metadata
• Add page numbers: add numbers to pages
• Unify page orientation: rotate pages to match
Each option expands additional settings when checked.
Add more files zone
Below the options, a dashed-border zone says Drop more files or click to browse with a plus icon. Use this to add additional PDFs after your initial upload.
File list
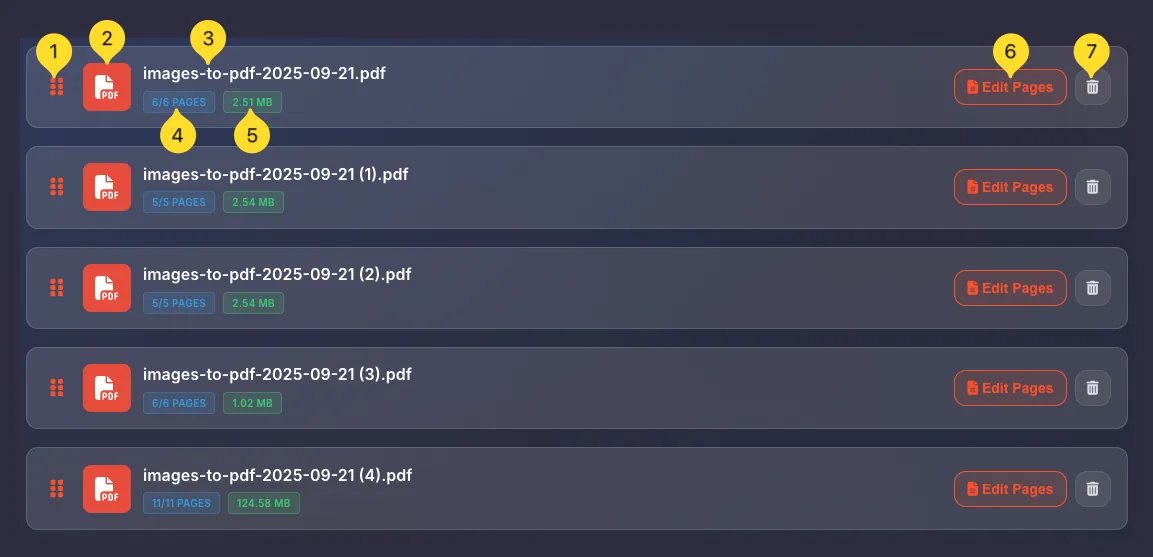
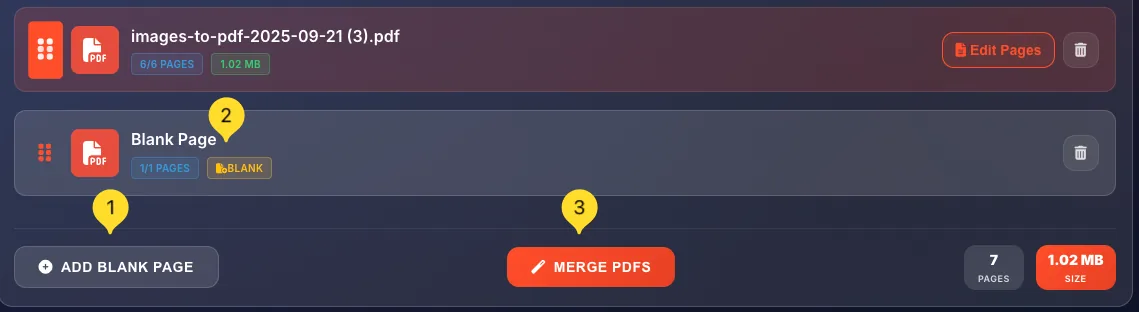
Your uploaded files appear as cards showing:
• Drag handle (6 dots) for reordering
• PDF icon
• Filename
• Pages badge (e.g., "46/46 PAGES")
• Size badge (e.g., "6.36 MB")
• Edit Pages button (orange)
• Delete button (trash icon)
Bottom action bar
At the bottom of the screen:
• + ADD BLANK PAGE button - insert empty pages
• MERGE PDFS button (orange) - start merging
• Pages counter (e.g., "138 PAGES")
• Size counter (e.g., "320.10 MB SIZE", orange background)
Favorites tab (right edge)
On the right edge of the screen, you'll find the Favorites tab (heart icon). Click it to add this tool to your favorites for quick access from the homepage.
Uploading files
There are multiple ways to add PDF files to the merger:
Drag and drop
The easiest way - drag PDF files from your computer and drop them onto the drop zone. The zone will highlight when files are over it. Release to upload.
Click to browse
Click anywhere in the drop zone (or the SELECT FILES button) to open your system's file browser. Navigate to your PDFs, select one or more files, and click Open.
Multiple files at once
Select multiple files by holding Ctrl (Windows) or ⌘ (Mac) while clicking. Or drag a selection box around multiple files in your file browser.
Add more files later
After initial upload, use the Drop more files or click to browse zone to add additional PDFs. You can keep adding files until you're ready to merge.
File list
Each uploaded PDF appears as a card in the file list. Here's what each element means:
Drag handle (6 dots)
The vertical dots on the left side of each file card are the drag handle. Click and hold this area, then drag the file to a new position to reorder your files.
PDF icon
The PDF icon indicates this is a valid PDF file. It helps you visually distinguish files in the list.
Filename
The filename appears next to the icon. Long filenames may be truncated with "..." but you can hover to see the full name.
Pages badge
Shows the page count in format X/Y PAGES where:
• X = pages selected (will be included in merge)
• Y = total pages in the file
Example: "46/46 PAGES" means all 46 pages are selected. "20/46 PAGES" means only 20 of 46 pages will be merged.
Size badge
Shows the file size in KB or MB. This helps you estimate the final merged file size.
Example: "6.36 MB".
Edit Pages button
The Edit Pages button opens the Edit Pages modal where you can select specific pages, preview pages, and rotate individual pages.
Delete button
The trash icon on the right removes this file from the merge list. The file is removed immediately - no confirmation dialog.
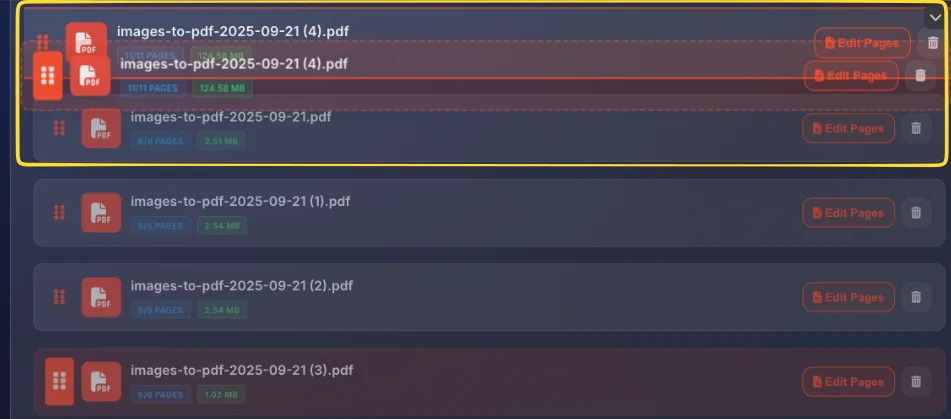
Reordering files
The order of files in the list determines the order of pages in the merged PDF. Here's how to rearrange them:
Grab the drag handle
Move your cursor over the 6 dots (drag handle) on the left side of any file card. Your cursor will change to indicate you can drag.
Drag to new position
Click and hold the drag handle, then move the file up or down. You'll see a visual indicator showing where the file will be placed.
Release to drop
Release the mouse button to drop the file in its new position. Other files will shift automatically to accommodate.
Final order
The first file in the list becomes the first pages of the merged PDF. The last file becomes the last pages. Verify the order before merging.
Merge options
The MERGE OPTIONS panel contains three powerful features that customize how your PDFs are combined. Each option is a checkbox that you can enable or disable.
When you check an option, additional settings may appear below it.
Preserve metadata
PDF files contain hidden metadata like title, author, creation date, and keywords. The Preserve metadata option controls what happens to this information.
What is metadata?
PDF metadata includes:
• Title: document title
• Author: who created it
• Subject: what it's about
• Keywords: searchable tags
• Creator: software used
• Creation/modification dates
When checked
The merged PDF inherits metadata from the first file in your list. The author, title, and other properties from that file are preserved in the final document.
When unchecked
Metadata is not preserved. The merged PDF will have blank or default metadata. This creates a "clean" document without any original file information.
Add page numbers Popular
The Add page numbers option automatically adds page numbers to every page in the merged document. When checked, a position selector appears.
Enable page numbering
Check the Add page numbers checkbox. A new section called PAGE NUMBER POSITION appears with 6 position buttons arranged in a grid.
Position grid explained
The grid shows 6 positions around the page edges. Each button has an arrow icon pointing to that position:
Top row (3 positions):
• Top-left corner (↖)
• Top-center (↑)
• Top-right corner (↗)
Bottom row (3 positions):
• Bottom-left corner (↙)
• Bottom-center (↓) - selected by default
• Bottom-right corner (↘)
Select a position
Click any position button to select it. The selected position is visually highlighted. Only one position can be active at a time.
Numbering format
Page numbers appear as simple sequential numbers (1, 2, 3...) starting from the first page of the merged document.
Unify page orientation
The Unify page orientation option rotates all pages to match a single orientation. Useful when combining portrait and landscape documents.
Enable orientation unification
Check the Unify page orientation checkbox. A new section called UNIFIED ORIENTATION appears with 4 orientation options.
Orientation options
Choose from 4 rotation angles:
• 0° Portrait: upright (default, visually highlighted when selected)
• 90° Landscape →: rotated right
• 180° Portrait ↓: upside down
• 270° Landscape ←: rotated left
How it works
All pages that don't match the selected orientation are automatically rotated to match. For example, if you select 0° Portrait, all landscape pages are rotated to portrait.
When to use
Enable this when:
• Merging scanned documents with mixed orientations
• Combining documents for double-sided printing
• Creating presentations where all slides should be the same orientation
Edit Pages modal Powerful feature
The Edit Pages modal lets you select specific pages from each PDF, preview page content, and rotate individual pages. Click the Edit Pages button on any file to open it.
Open the modal
Click the Edit Pages button on any file card. A modal window appears showing all pages from that PDF file.

Modal header
The modal header shows:
• PDF icon
• Edit pages title
• Close button (X) in the top-right corner
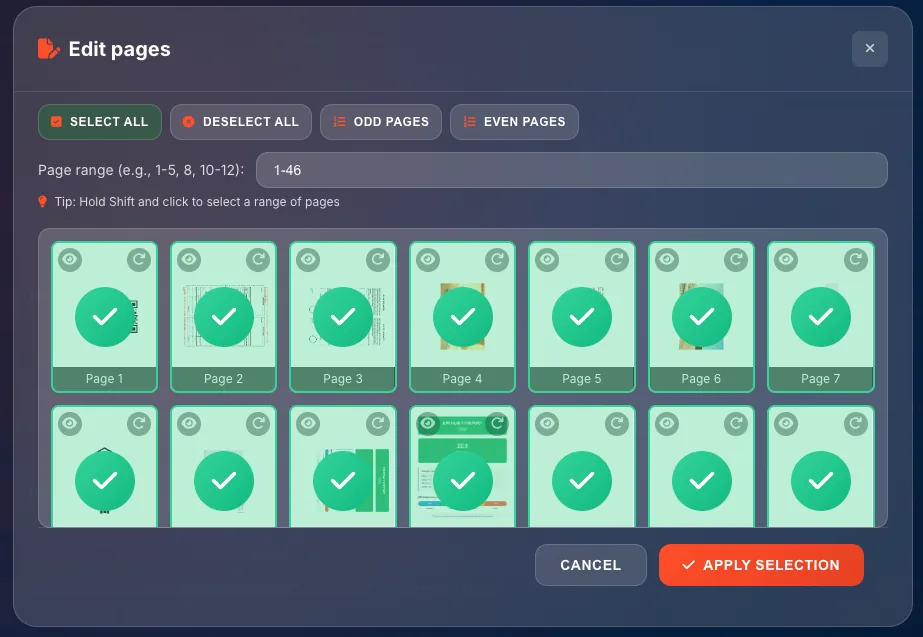
Quick selection buttons
Below the header, you'll find 4 quick selection buttons:
• SELECT ALL: selects every page
• DESELECT ALL: deselects every page
• ODD PAGES: selects pages 1, 3, 5, 7...
• EVEN PAGES: selects pages 2, 4, 6, 8...

Page range input
The Page range input field lets you type specific pages. Format examples:
• 1-5 - pages 1 through 5
• 1-5, 8 - pages 1-5 and page 8
• 1-5, 8, 10-12 - pages 1-5, 8, and 10-12
Press Enter or click outside to apply the range.

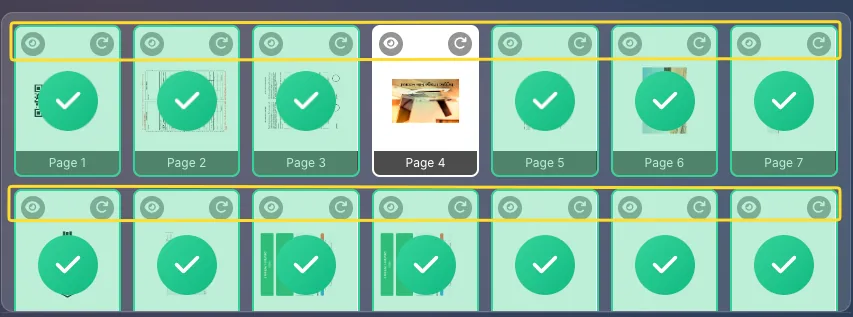
Shift-click tip
Below the range input, you'll see a tip: "Hold Shift and click to select a range of pages". This is a quick way to select consecutive pages - click the first page, hold Shift, then click the last page.

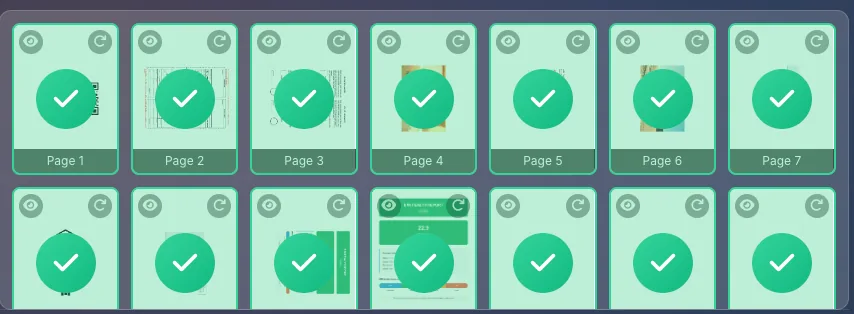
Page thumbnails grid
The main area shows all pages as thumbnail cards in a grid. Each thumbnail shows:
• Page preview image (visual thumbnail of the page content)
• Preview button (eye icon) in the top-left corner
• Rotation button (rotate icon) in the top-right corner
• Selection checkmark (overlay) when selected
• Page number label at the bottom ("Page 1", "Page 2"...)
Action buttons
At the bottom of the modal:
• CANCEL button - close without saving changes
• APPLY SELECTION button (orange) - save your selection and close

Page selection
Selecting pages determines which pages from each PDF will be included in the merged document. Here's how to select pages:
Click to toggle
Click any page thumbnail to toggle its selection. Selected pages show a checkmark overlay. Deselected pages show no overlay.
Shift-click for range
To select a range - click the first page, hold Shift, then click the last page. All pages between them are selected.
Use quick buttons
For common selections:
• SELECT ALL: when you want every page
• DESELECT ALL: start fresh with no pages
• ODD PAGES: for single-sided printing
• EVEN PAGES: for the back sides of double-sided prints
Type a page range
For precise control, type in the Page range input:
• 1-10 selects pages 1 through 10
• 1, 5, 10 selects only those specific pages
• 1-5, 10-15, 20 combines ranges and single pages
Apply your selection
When done, click APPLY SELECTION. The file card updates to show the new page count (e.g., "20/46 PAGES" means 20 of 46 pages selected).
Page preview & rotation
Each page thumbnail has two action buttons for preview and rotation:
Preview button (eye icon)
The eye icon in the top-left corner of each thumbnail opens a larger preview of that page. Use this to verify page content before selecting.
Rotation button (rotate icon)
The rotate icon in the top-right corner rotates that specific page by 90° clockwise each time you click. This is individual page rotation: different from the global orientation option.
Multiple rotations
Click the rotation button multiple times:
• 1 click = 90° (landscape right)
• 2 clicks = 180° (upside down)
• 3 clicks = 270° (landscape left)
• 4 clicks = 360° (back to original)
When to rotate
Rotate individual pages when:
• A scanned page is sideways
• A specific page needs different orientation
• You want to correct upside-down pages
Add blank page
The + ADD BLANK PAGE button at the bottom of the screen inserts an empty page into your merge.
Click to add
Click the + ADD BLANK PAGE button in the bottom-left corner. A blank page is added to the file list.
Reposition the blank page
Use drag and drop to move the blank page to wherever you need it in the merge order - between files, at the beginning, or at the end.
Multiple blank pages
Click the button multiple times to add several blank pages. Each one appears in the file list and can be positioned independently.
When to use
Add blank pages when:
• Documents should start on odd pages (for double-sided printing)
• You need separator pages between sections
• Creating space for notes or signatures
• Matching a required page count
Statistics counters
At the bottom-right of the screen, two counters show the total size of your merge:
Pages counter
Shows the total number of pages that will be in the merged document.
Example: 138 PAGES. This is the sum of all selected pages from all files.
Size counter
Shows the total file size in MB with an orange background.
Example: 320.10 MB SIZE. This is an estimate of the merged file size (actual size may vary slightly after processing).
Real-time updates
Both counters update automatically as you:
• Add or remove files
• Select/deselect pages in Edit Pages
• Add blank pages

Merging & downloading
Once you've set up your files and options, here's how to complete the merge:
Review your setup
Before merging, verify:
• Files are in the correct order
• Page selections are correct (check X/Y PAGES badges)
• Merge options are set as needed
• Statistics show expected page count
Click MERGE PDFS
Click the orange "MERGE PDFS" button (with magic wand icon) at the bottom-center of the screen. The merging process begins.
Wait for processing
A progress indicator shows the merge status. Processing time depends on:
• Number of files
• Total page count
• File sizes
• Your device's processing power
Most merges complete in seconds.
Download the result
Once complete, the merged PDF downloads automatically, or a download button appears. The file is named based on your source files or with a default name like "merged.pdf".
Verify the result
Open the downloaded PDF to verify:
• All pages are present
• Page order is correct
• Page numbers appear (if enabled)
• Orientation is correct