Overview
The PDF Splitter divides a single PDF into multiple separate files. It offers two powerful modes - Range mode for splitting by page ranges (fixed intervals or custom), and Pages mode for extracting individual pages. All processing happens locally in your browser - your documents never leave your device.
Interface overview
The PDF Splitter has a clean, organized interface. Here's what you'll find on the screen:
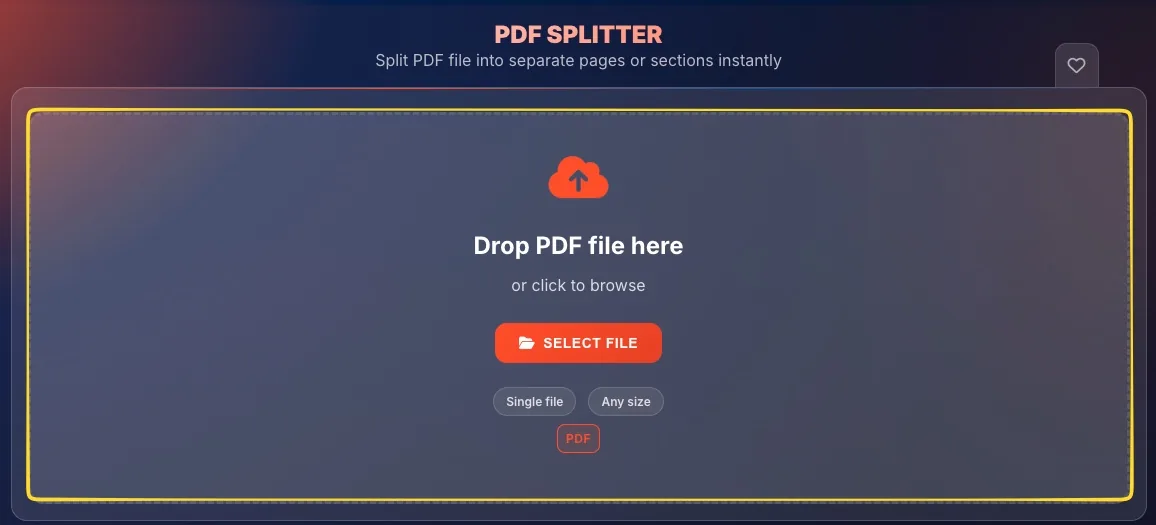
Drop zone (empty state)
When you first open the tool, you'll see a large drop zone with:
• Upload icon at the top
• Drop PDF file here heading or click to browse
• SELECT FILE button (orange)
• Badges: Single file, Any size, PDF
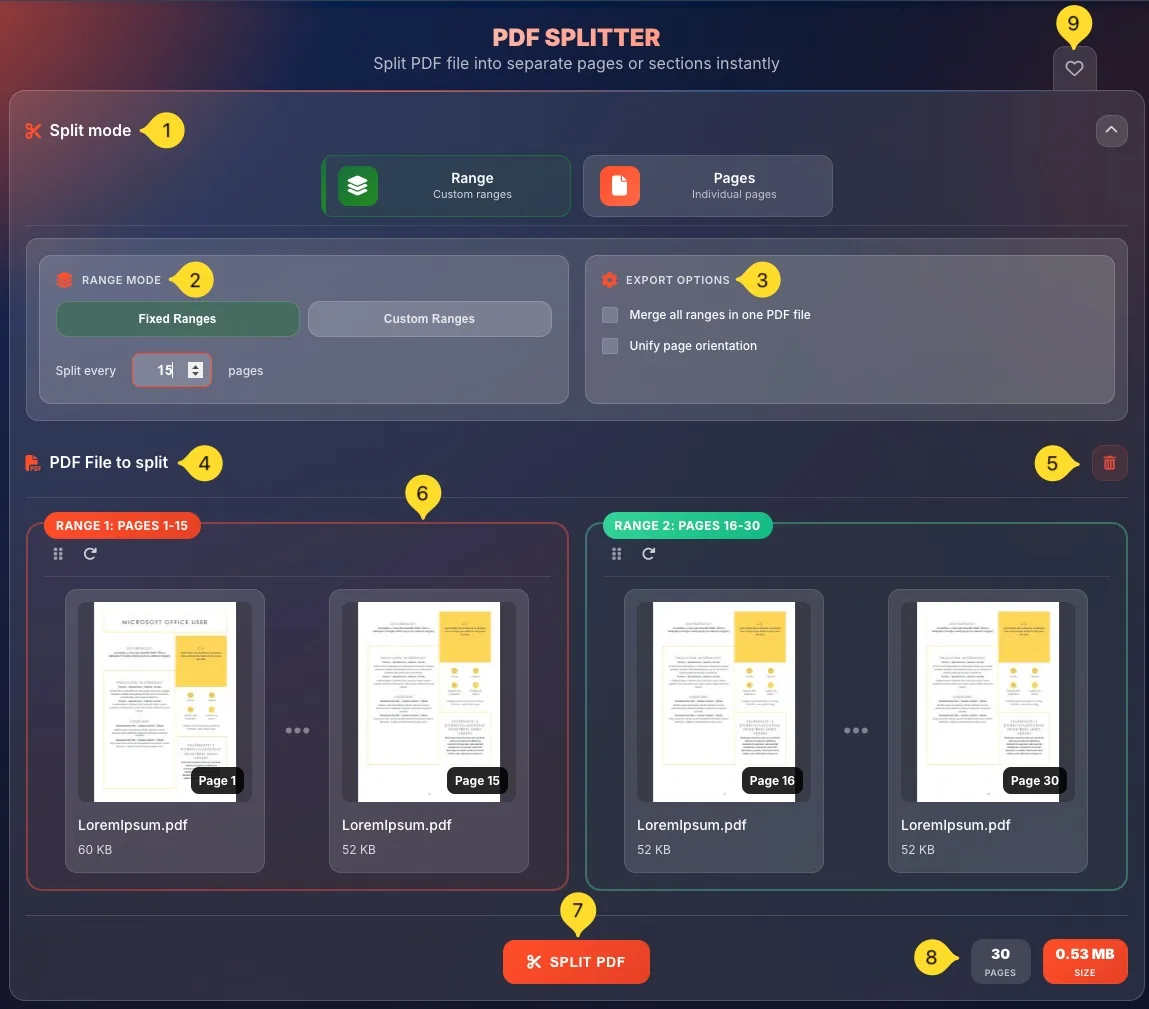
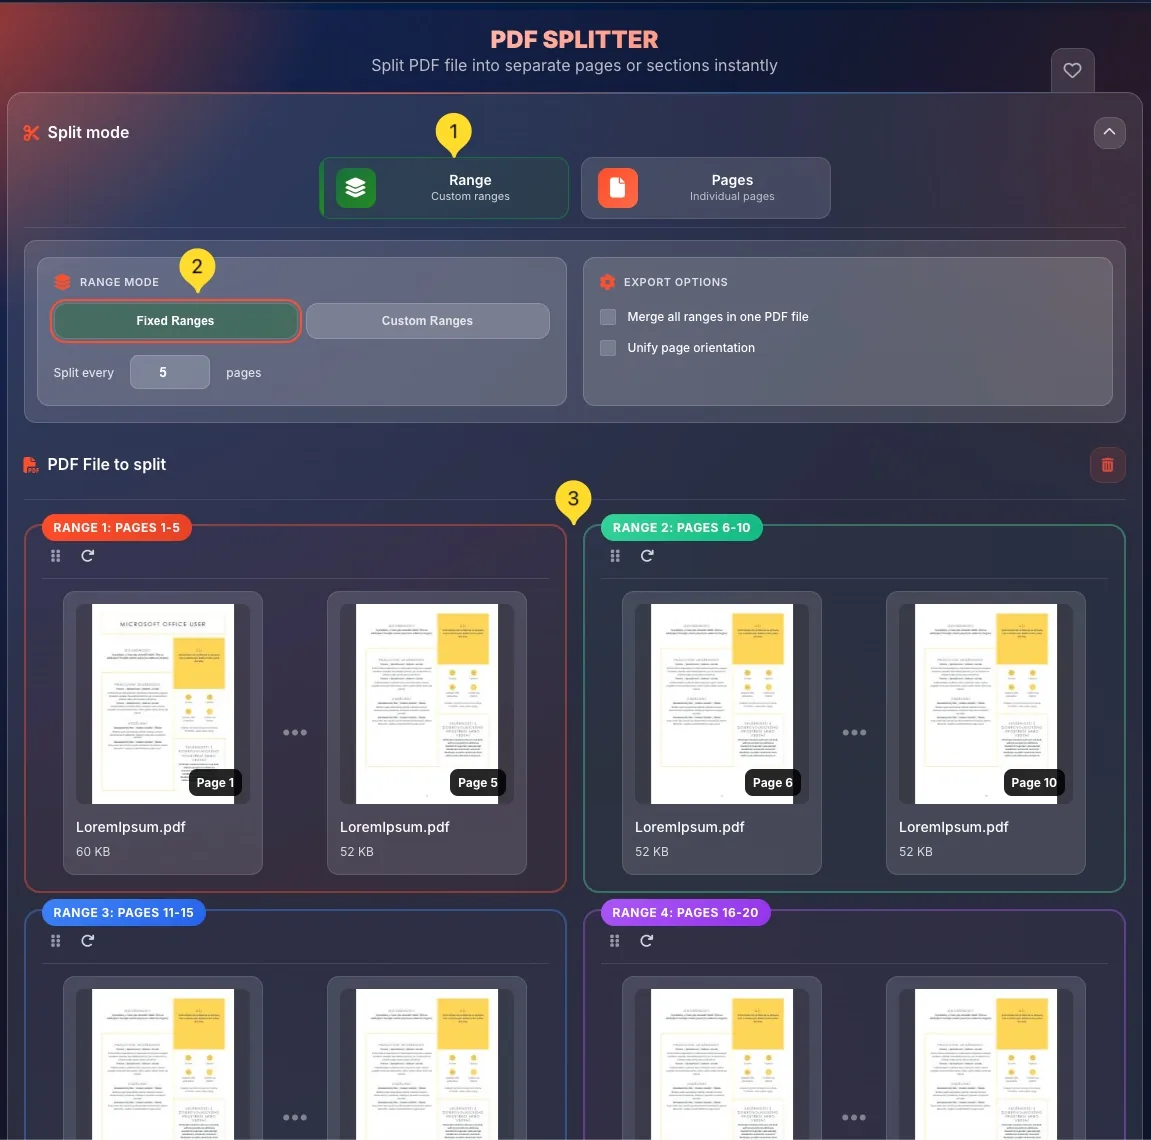
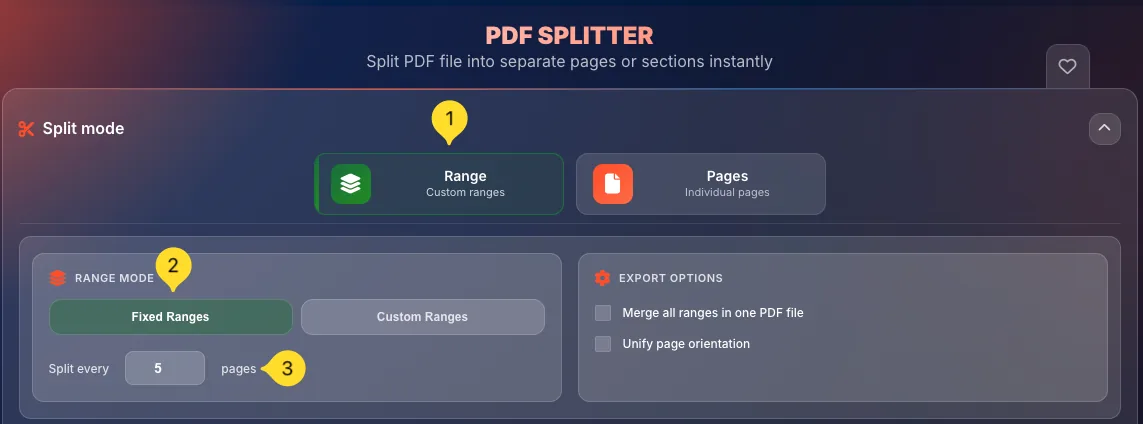
Split mode selector
After uploading a file, the Split mode panel appears at the top with two mode buttons:
• Range (layers icon) - Custom ranges
• Pages (file icon) - Individual pages
Click either button to switch modes. The active mode is visually highlighted.
Mode-specific options
Below the mode selector, you'll see options that change based on the selected mode:
• Range mode: RANGE MODE panel (Fixed/Custom Ranges)
• Pages mode: EXTRACT MODE panel (Select pages, Extract all, Deselect all)
Export options panel
On the right side of the options area, the EXPORT OPTIONS panel contains:
• Merge all ranges/extracted pages into one PDF file: combine output
• Unify page orientation: rotate pages to match
PDF File to split section
Below the options, you'll see:
• PDF File to split header with a PDF icon
• Delete button (trash icon) in the top-right corner
• Tip bar (in Pages mode) - Drag pages to reorder them before splitting
Page/Range display area
The main area shows your PDF pages:
• Range mode: Page ranges as grouped cards (Range 1, Range 2...)
• Pages mode: Individual page thumbnails in a grid
Bottom action bar
At the bottom of the screen:
• SPLIT PDF button (orange, scissors icon)
• Pages counter (e.g., "46 PAGES")
• Size counter (e.g., "6.36 MB SIZE", orange background)
Favorites tab (right edge)
On the right edge of the screen, you'll find the Favorites tab (heart icon). Click it to add this tool to your favorites for quick access.
Uploading a file
The PDF Splitter works with a single PDF file at a time. Here's how to upload:
Drag and drop
Drag a PDF file from your computer and drop it onto the drop zone. The zone will highlight when a file is over it. Release to upload.
Click to browse
Click anywhere in the drop zone (or the SELECT FILE button) to open your system's file browser. Navigate to your PDF and click Open.
Single file only
Unlike the PDF Merger, the Splitter accepts only one file at a time. If you need to split multiple PDFs, process them one by one.
File processing
After upload, the tool analyzes your PDF and generates page thumbnails. This may take a moment for large files. Once ready, you'll see all pages displayed.

Split modes
The PDF Splitter offers two main modes, each designed for different splitting needs:
• Range mode: Split by page ranges (every N pages, or custom ranges)
• Pages mode: Extract individual pages with full control
The mode buttons are at the top of the screen in the Split mode panel. Each button shows an icon, title, and description. Click to switch modes - the active mode has a colored border.
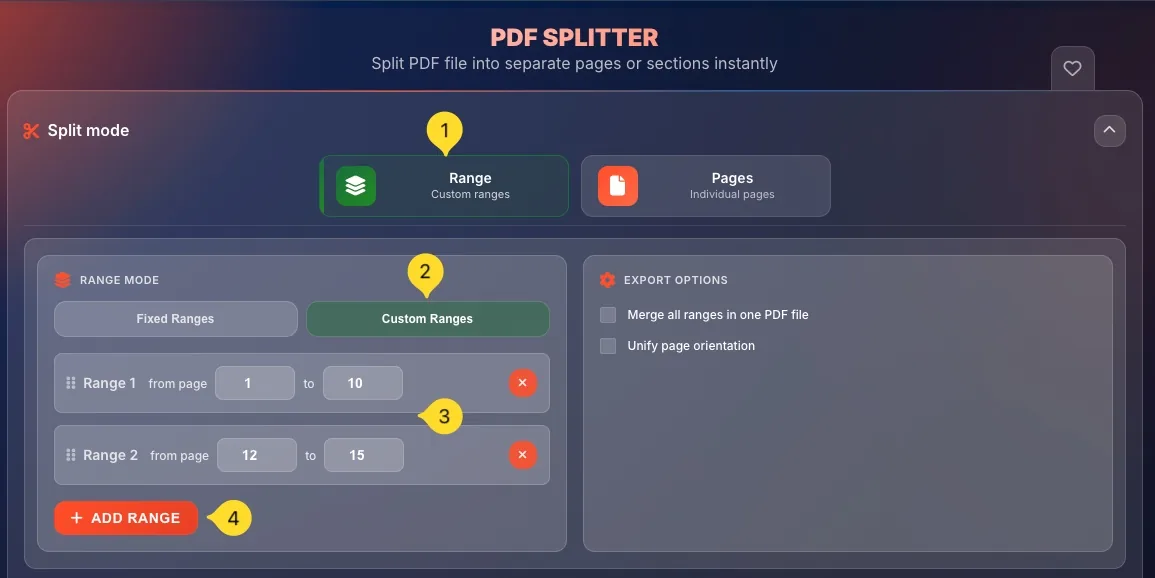
Range mode Custom ranges
Range mode splits your PDF into groups of consecutive pages. You can use fixed intervals (split every N pages) or define custom page ranges.
Select Range mode
Click the Range button (layers icon). It shows Custom ranges as the description. The button is highlighted when active.
RANGE MODE panel
A panel appears with two tabs:
• Fixed Ranges (selected by default) - split at regular intervals
• Custom Ranges: define your own page groupings
View range preview
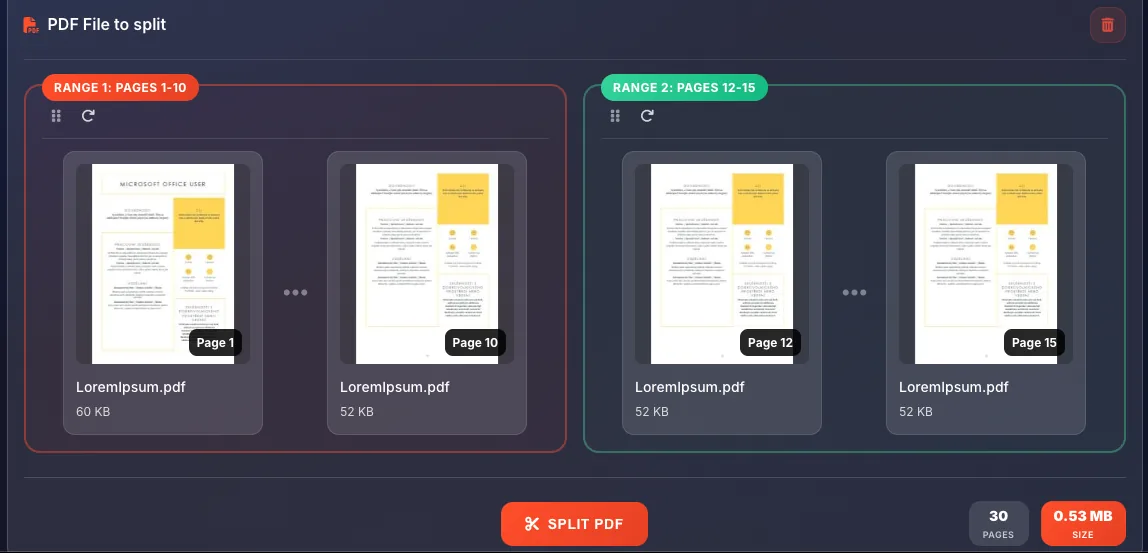
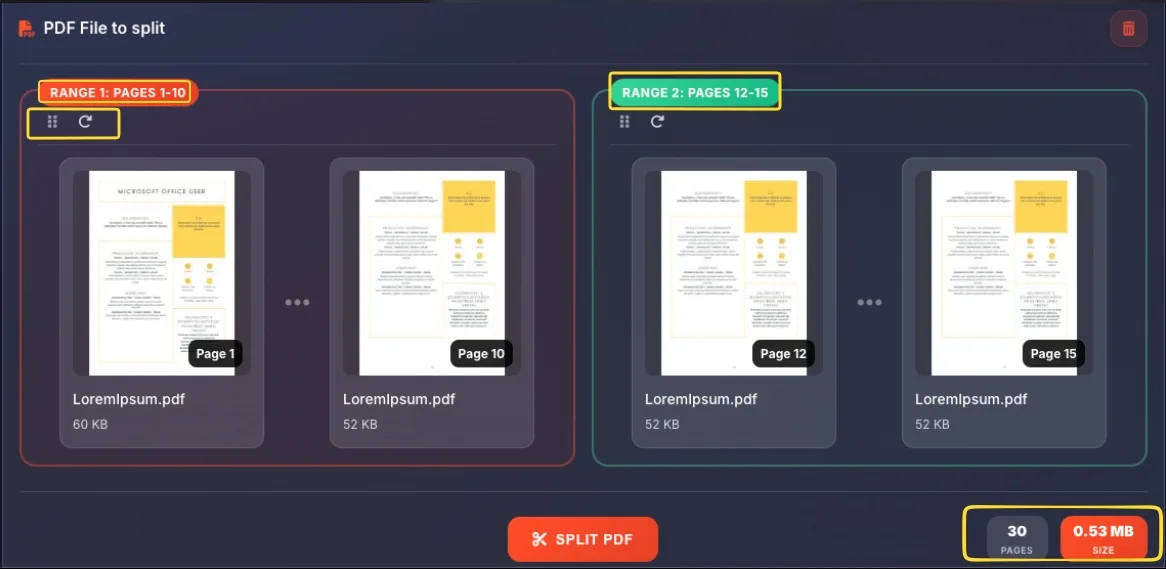
Below the options, your PDF is displayed as range cards. Each card shows a group of pages that will become one output file. Cards are color-coded (red, green, blue, etc.) for easy distinction.
Fixed ranges
Fixed Ranges splits your PDF at regular intervals - every 2 pages, every 5 pages, etc.
Select Fixed Ranges
In the RANGE MODE panel, click Fixed Ranges (the left tab). It becomes highlighted when selected.
Set the interval
You'll see: Split every [ ] pages
The input field (with a number, e.g., "2") controls how many pages go into each output file.
Enter your interval
Type a number or use the controls to set the interval:
• 2 = split every 2 pages (1-2, 3-4, 5-6...)
• 5 = split every 5 pages (1-5, 6-10, 11-15...)
• 10 = split every 10 pages
Automatic calculation
The tool automatically calculates how many output files you'll get. A 46-page PDF split every 2 pages creates 23 range cards (23 output files).
View the ranges
Range cards update instantly to show the new groupings:
• RANGE 1: PAGES 1-2
• RANGE 2: PAGES 3-4
• RANGE 3: PAGES 5-6
• etc.
Custom ranges
Custom Ranges lets you define exactly which pages go into which output file.
Select Custom Ranges
In the RANGE MODE panel, click Custom Ranges (the right tab).
Define your ranges
Enter page ranges manually. Common formats:
• 1-10 - pages 1 through 10 in one file
• 1-5, 6-10, 11-15 - three separate files
• 1-3, 7-9, 15-20 - non-consecutive ranges
Add/remove ranges
Use the interface controls to:
• Add new range groupings
• Remove existing ranges
• Modify range boundaries
Reorder ranges
Drag range cards to reorder them. The output files will be numbered in the order shown.
Range cards
In Range mode, your PDF pages are displayed as range cards - grouped containers showing which pages will go into each output file.
Range label
Each card has a colored label at the top showing:
• Range number (RANGE 1, RANGE 2...)
• Page range (PAGES 1-2, PAGES 3-4...)
Labels are color-coded - red, green, blue, etc., for easy visual distinction.
Card controls
Each range card has controls in the top-left corner:
• Drag handle (6 dots) - reorder ranges
• Rotation button (rotate icon) - rotate all pages in this range
Page thumbnails
Inside each card, you'll see thumbnails of the pages in that range. Each thumbnail shows:
• Page preview image
• Page number badge ("Page 1", "Page 2"...)
• Filename (truncated if long)
• Size (e.g., "42 KB")
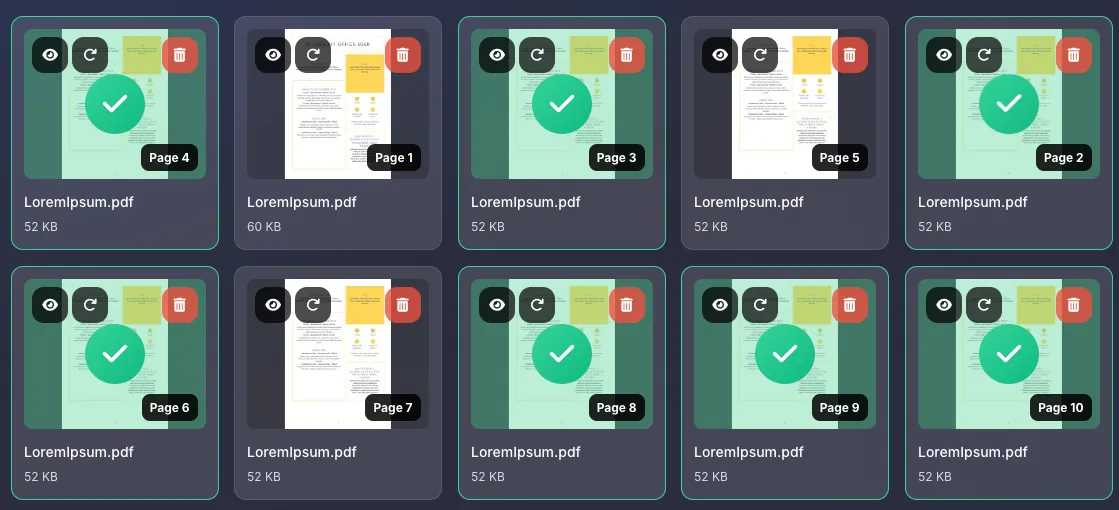
Pages mode Individual pages
Pages mode gives you complete control over individual pages. Select specific pages, reorder them, rotate them, or delete them before splitting.
Select Pages mode
Click the Pages button (file icon). It shows Individual pages as the description. The button is highlighted when active.
EXTRACT MODE panel
A panel appears with three extraction options:
• Select pages (orange, default) - manually choose pages
• Extract all pages: select every page
• Deselect all: clear all selections
Page selection tools
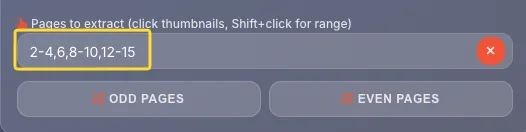
Below the extract mode buttons:
• Pages to extract tip with Shift+click hint
• Page range input field ("Enter page numbers: 1-3, 5, 7-10")
• ODD PAGES button - select pages 1, 3, 5...
• EVEN PAGES button - select pages 2, 4, 6...
View pages
All pages appear as individual thumbnails in a grid (not grouped into ranges). Each page can be independently selected, rotated, reordered, or deleted.

Extract mode options
The EXTRACT MODE panel in Pages mode offers three quick options:
Select pages
Click Select pages (orange button) to enter manual selection mode. You can then click individual page thumbnails to select/deselect them.
Extract all pages
Click Extract all pages to select every page in the PDF. All thumbnails become selected (shown with selection indicator).
Deselect all
Click Deselect all to clear all selections. Start fresh with no pages selected.
Page selection
In Pages mode, you have multiple ways to select which pages to extract:
Click thumbnails
Click any page thumbnail to toggle its selection. Selected pages show a visual indicator (checkmark or highlight). Click again to deselect.
Shift-click for range
To select a consecutive range: click the first page, hold Shift, then click the last page. All pages between them are selected.
Type page numbers
Use the page range input field. Enter page numbers:
• 1-3 - pages 1, 2, 3
• 5 - page 5 only
• 1-3, 5, 7-10 - combined ranges
ODD PAGES button
Click ODD PAGES to select pages 1, 3, 5, 7... Useful for extracting one side of double-sided scans.
EVEN PAGES button
Click EVEN PAGES to select pages 2, 4, 6, 8... Useful for extracting the other side of double-sided scans.
Page thumbnails
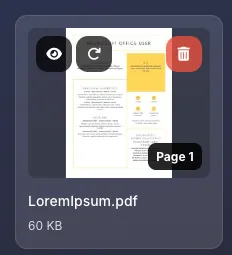
In Pages mode, each page is displayed as an interactive thumbnail card. Here's what each element shows:
Page preview
The main area shows a visual thumbnail of the page content. This helps you identify pages before selecting them.
Page number badge
A badge in the bottom-right corner shows the page number ("Page 1", "Page 2"...). This is the page's position in the original PDF.
Filename
Below the thumbnail, you'll see the source filename (truncated with "..." if long).
File size
The estimated size of this page in KB is shown below the filename (e.g., "42 KB", "89 KB").
Action buttons
Each thumbnail has three action buttons in the top corners:
• Preview (eye icon) - top-left
• Rotate (rotate icon) - top-left
• Delete (trash icon) - top-right
Page actions
Each page thumbnail in Pages mode has action buttons for preview, rotation, and deletion:
Preview button (eye icon)
Click the eye icon in the top-left corner to open a larger preview of the page. Use this to verify page content before deciding whether to include it.
Rotate button (rotate icon)
Click the rotate icon next to the eye to rotate this specific page 90° clockwise. Click multiple times for more rotation:
• 1 click = 90°
• 2 clicks = 180°
• 3 clicks = 270°
• 4 clicks = back to 0°
Delete button (trash icon)
Click the trash icon in the top-right corner to remove this page from the split. The page won't be included in any output file.
Note: This doesn't modify your original PDF - it only excludes the page from this split operation.
Reordering pages
In Pages mode, you can drag pages to change their order before splitting. This is shown by the tip: Drag pages to reorder them before splitting.
Grab a page
Click and hold on any page thumbnail. The cursor changes to indicate you can drag.
Drag to new position
While holding, drag the page to its new position in the grid. Other pages will shift to make room.
Release to drop
Release the mouse button to drop the page in its new position. The page order updates immediately.
Output order
When you enable "Merge extracted pages into one PDF file", pages appear in the order shown. So reordering lets you create a custom page sequence in the output.
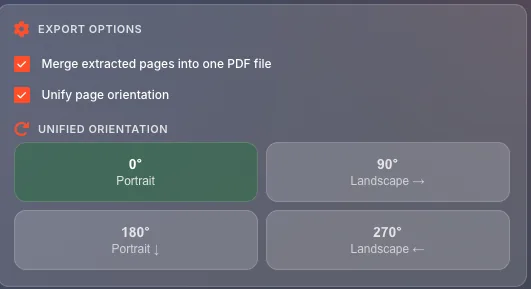
Export options
The EXPORT OPTIONS panel (right side) controls how your split files are created:
Merge into one PDF file
The first checkbox says (depending on mode):
• Range mode - Merge all ranges in one PDF file
• Pages mode - Merge extracted pages into one PDF file
When checked: All selected pages/ranges are combined into a single output PDF.
When unchecked: Each range or page becomes a separate PDF file.
Unify page orientation
The second checkbox: Unify page orientation
When checked: All pages are rotated to match the same orientation (portrait or landscape).
When unchecked: Each page keeps its original orientation.
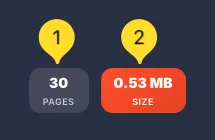
Statistics counters
At the bottom-right of the screen, two counters show information about your PDF:
Pages counter
Shows the total page count of your uploaded PDF.
Example: "46 PAGES". This helps you specify accurate page ranges.
Size counter
Shows the total file size with an orange background.
Example: "6.36 MB SIZE". This gives you an idea of output file sizes.
Splitting & downloading
Once you've configured your split settings, here's how to complete the process:
Review your setup
Before splitting, verify:
• Range mode: Range cards show correct page groupings
• Pages mode: Correct pages are selected, order is correct
• Export options: Merge and orientation settings are correct
Click SPLIT PDF
Click the orange SPLIT PDF button (with scissors icon) at the bottom-center of the screen. The splitting process begins.
Wait for processing
A progress indicator shows the split status. Processing time depends on:
• Number of pages
• File size
• Number of output files
• Your device's processing power
Download results
Once complete:
• Single file (merge enabled) - One PDF downloads
• Multiple files (merge disabled) - ZIP file downloads containing all PDFs, or individual download buttons appear
Verify output
Open your downloaded file(s) to verify:
• Correct pages are included
• Page order is correct
• Rotation is correct (if you rotated pages)
Tips & Best practices
Frequently asked questions
• Pages mode: gives you individual page control - select, delete, rotate, and reorder any page independently