Overview
The Code Editor is a powerful browser-based IDE (Integrated Development Environment) supporting 11 file types including HTML, CSS, JavaScript, Python, Java, C, C++, PHP, JSON, XML, and plain text. It features live preview for web projects, project management, starter templates, multiple layout options, and a customizable editing experience. Build complete applications - from simple pages to interactive games - without installing any software.
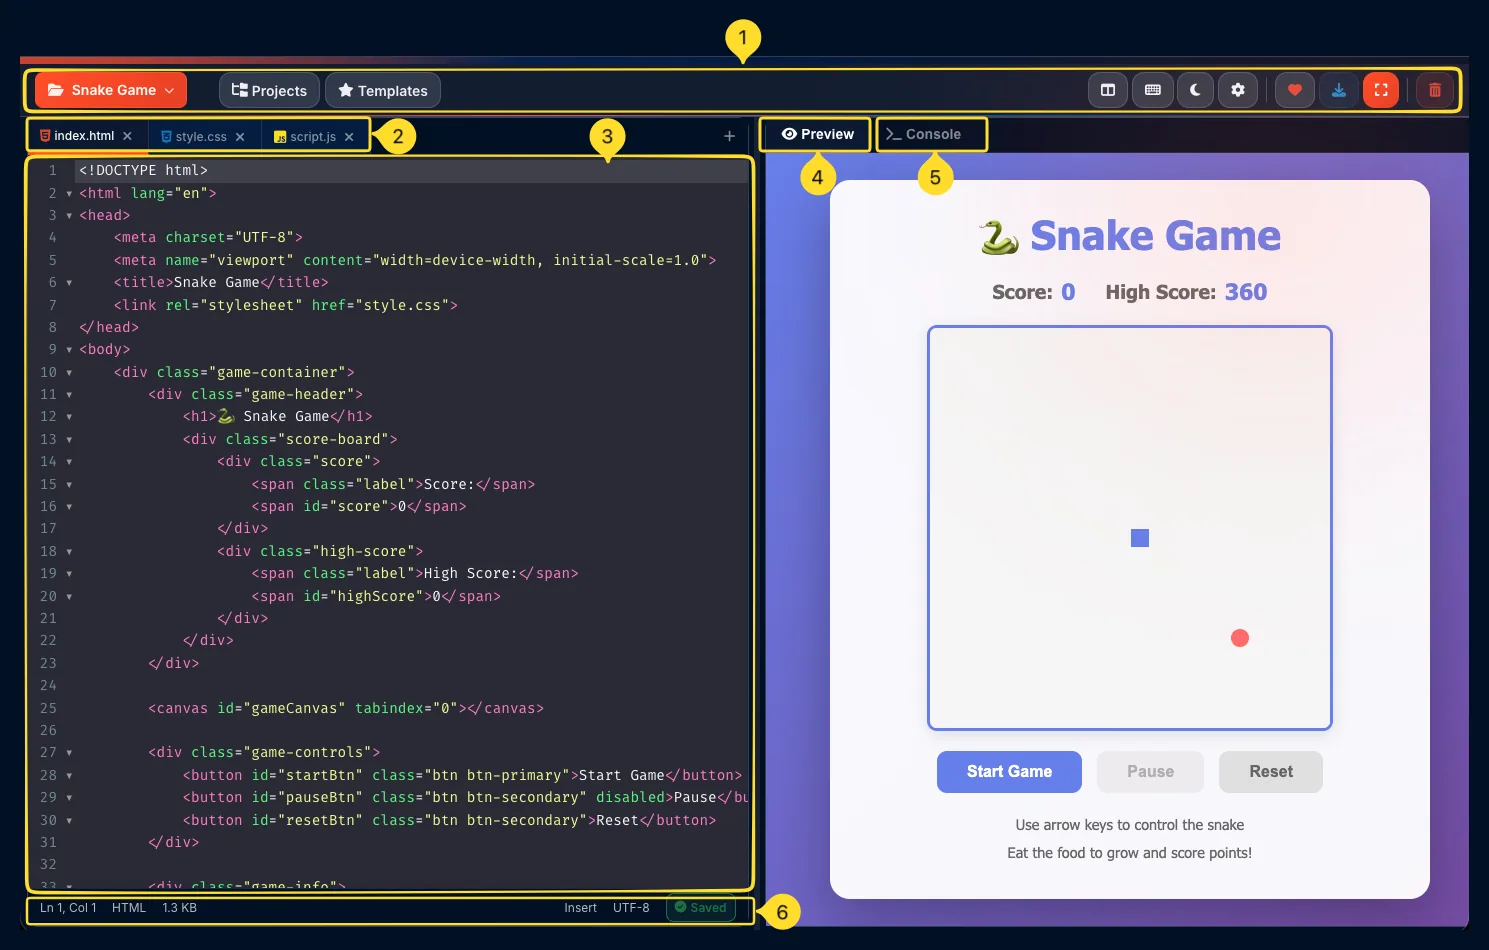
Interface overview
The code editor interface is divided into several key areas. Understanding each component helps you navigate and use the editor efficiently.
Header toolbar
The top bar contains:
• Project name dropdown: orange, left side
• Projects button
• Templates button: star icon
• Action icons on the right: layout, keyboard shortcuts, dark mode, settings, favorite, download, and delete
File tabs row
Below the header, file tabs show your project files. Default files are:
• index.html: orange icon
• style.css: blue icon
• script.js: yellow icon
Each tab has minimize, maximize, and close buttons (depends on layout).
Code editor panels
The main area shows code editors with line numbers on the left, syntax highlighting, and the code content. In Split view, panels are side-by-side with tabs. In other layouts, panels are arranged differently.
Preview panel
Shows the live preview of your project. Updates in real-time as you edit code. Located on the right side in Split view, or can be positioned differently in other layouts.
Console tab
Next to the Preview tab, the Console tab shows JavaScript console output, errors, and logs. Essential for debugging your code.
Status bar
At the bottom:
• Cursor position: Ln 1, Col 1
• File type: HTML/CSS/JS
• File size: e.g., 1.3 KB
• Insert mode
• Encoding: UTF-8
• Save status: Saved
Header toolbar Navigation
The header toolbar provides quick access to all major functions. Each button has a specific purpose.
Project name dropdown (orange)
Shows the current project name (e.g., Snake Game). Click to open the Switch project modal where you can switch between projects, rename, or delete projects.
Projects button
Click the Projects button to open the project switcher modal. Lists all your saved projects with options to create new ones, switch between existing, edit names, or delete.
Templates button
Click the Templates button to open the template chooser. Start new projects from pre-built templates like Snake Game, Calculator, or Drawing App.
Layout button
Opens the Choose layout modal. Switch between Split view, Stacked view, or Multi-window mode to arrange your code panels and preview.
Dark mode toggle
Toggles between dark and light editor themes. Dark mode is easier on the eyes for extended coding sessions.
Settings button
Opens Editor settings modal with three tabs: Editor (behavior settings), Font (family and size), and Indentation (tab size).
Favorite button
Adds the Code Editor to your favorites for quick access from the command palette.
Download button
Downloads your project as a ZIP file containing all files (index.html, style.css, script.js). Use this to save your work locally or deploy elsewhere.
Focus mode button
Toggles Focus mode which hides the header toolbar and file tabs for distraction-free coding. Only the code editors and preview remain visible. Click again or press Escape to exit.
Clear all data button
Factory reset - clears ALL projects, files, settings, layout preferences, theme, and statistics. The editor returns to its original default state. This action cannot be undone - make sure to download important projects first.
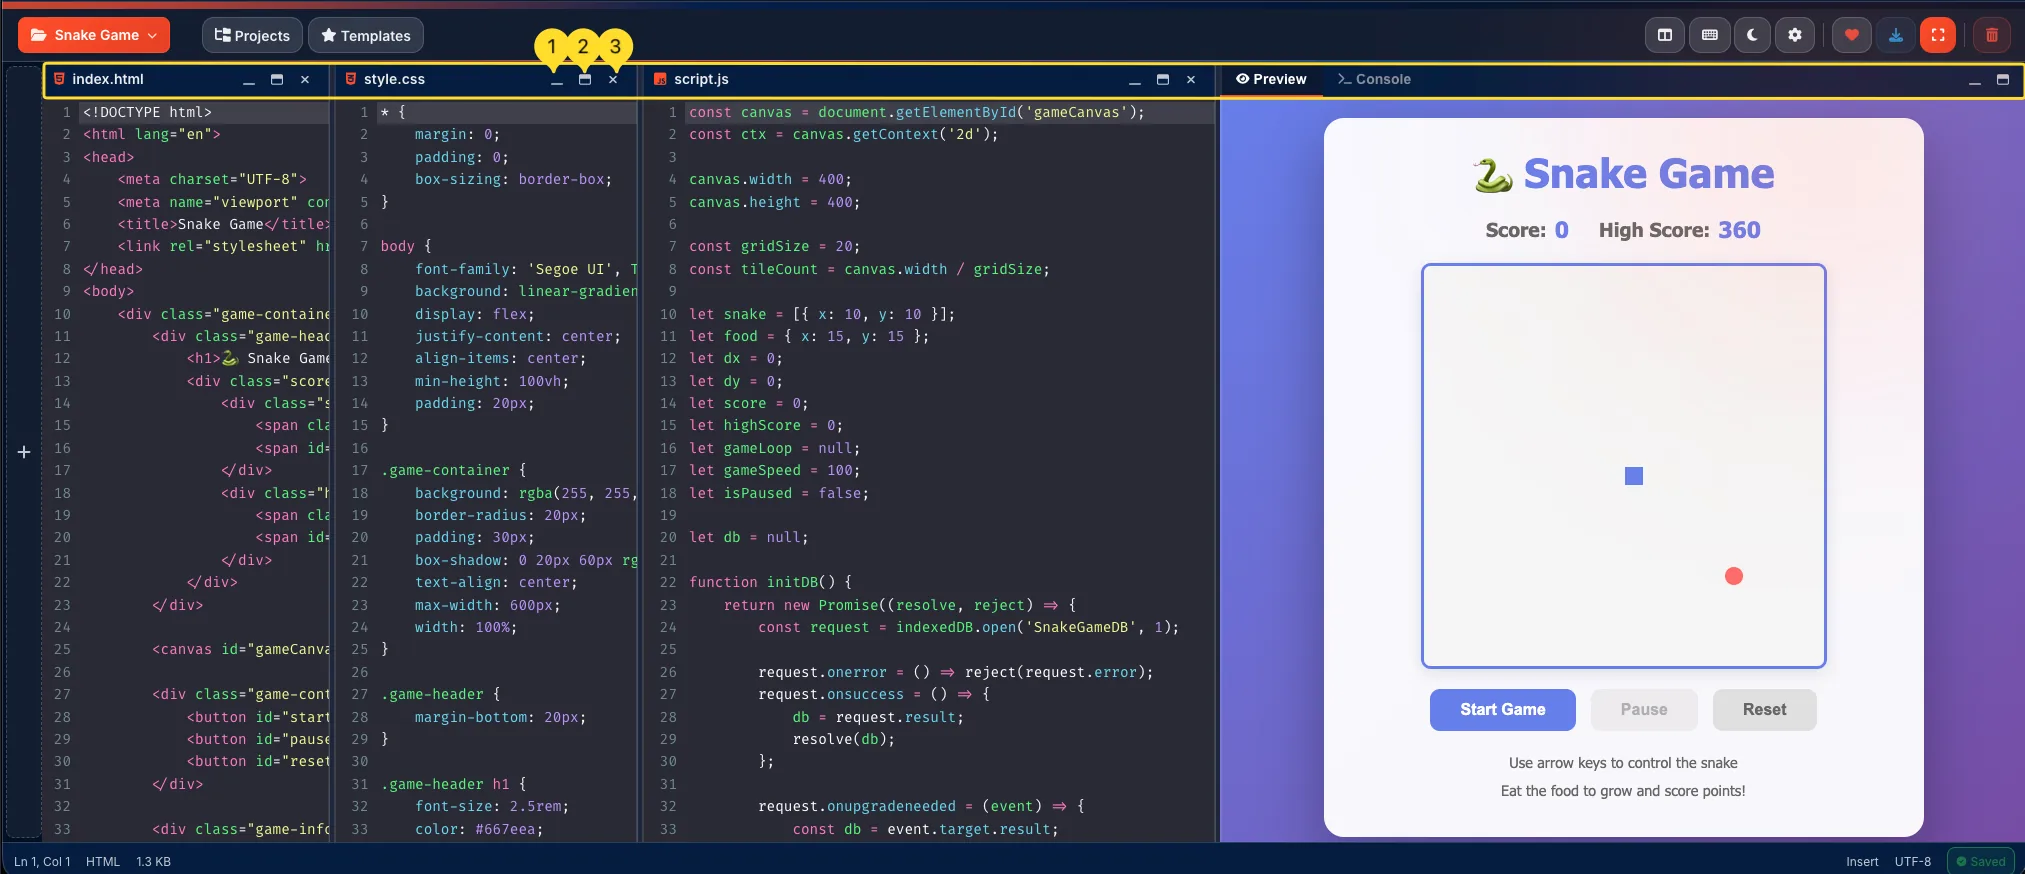
File tabs
File tabs let you switch between your project files and control each editor panel.
index.html tab
The HTML file contains your page structure and content. Click this tab to edit HTML code. The orange document icon indicates an HTML file.
style.css tab
The CSS file contains your styles and design. Click to edit CSS code. The blue icon indicates a stylesheet file.
script.js tab
The JavaScript file contains your interactive logic. Click to edit JS code. The yellow icon indicates a JavaScript file.

Add new file button
Click the + button at the end of the tab row to add a new file to your project. A modal opens where you can choose from 11 supported file types.
Minimize button
Stacked view and Multi-window view only:
Click the minimize button on a tab to collapse that panel. The panel shrinks to a thin bar, giving more space to other panels.
Maximize button
Stacked view and Multi-window view only:
Click the maximize button to expand the panel to full size. Other panels are hidden temporarily. Click again to restore normal layout.
Close button
Stacked view and Multi-window view: Full close button with X icon.
Split view: Tabs only show a small X for closing. Click to close the panel - the file isn't deleted, just hidden. Reopen from the Folders & Files panel.
Active tab indicator
The currently active/focused tab is highlighted. When you type, code goes into the active editor. Click a tab to switch focus.
Code editor panels Core Feature
The code panels are where you write and edit your code. Each panel is a full-featured code editor with professional features.
Line numbers
The left gutter shows line numbers starting from 1. Click a line number to select the entire line. Line numbers help you navigate and reference code locations.
Syntax highlighting
Code is color-coded by type:
• Tags (HTML elements) in one color
• Attributes in another
• Strings in a distinct color
• Keywords highlighted differently
• Comments usually dimmed
This makes code readable and errors easier to spot.
Active line highlighting
The current line (where your cursor is) is highlighted with a subtle background color. This helps you track your position in the code.
Cursor and typing
Click anywhere in the editor to place your cursor. Start typing to insert code. The cursor blinks to show your position.
Auto-indentation
Press Enter after an opening bracket or tag, and the cursor automatically indents to the correct level. Keeps your code properly formatted.
Bracket matching
Click next to any bracket, parenthesis, or brace to highlight its matching pair. Essential for tracking nested structures in complex code.
Auto-close brackets/tags
Type an opening bracket { or tag <div> and the editor automatically adds the closing } or </div>. Saves time and prevents missing closers.
Selection and editing
• Click and drag: select text
• Double-click: select a word
• Triple-click: select a line
Selected text can be copied, cut, or replaced by typing.
Find in file
The editor includes a built-in search system with regex support for finding text within your code files.
Open Find bar
Press Ctrl + F to open the find bar at the top of the active editor panel. A search input field appears ready for your query. The hint (Use /re/ syntax for regexp search) is displayed next to the input.
Find text
Type your search term in the input field. All matching occurrences are highlighted in the editor. The search works within the currently active file.
Regex search
For advanced searches, use regex syntax by wrapping your pattern in forward slashes:
• /let/ — find all occurrences of "let"
• /function\s+\w+/ — find function declarations
• /\d+/ — find all numbers
Close the find bar
Press Escape to close the find bar and return to editing.
Preview & Console
The Preview panel shows your project running live. The Console shows JavaScript output and errors.
Preview tab
Click the Preview tab to see your project rendered as a live webpage. This is where you see the actual result of your HTML, CSS, and JavaScript code combined.
Live updates
Changes you make in the code editors are reflected instantly in the preview. No need to manually refresh - the preview updates automatically as you type.
Interactive preview
The preview is fully interactive. You can click buttons, fill forms, play games, and test all your JavaScript functionality right in the preview panel.
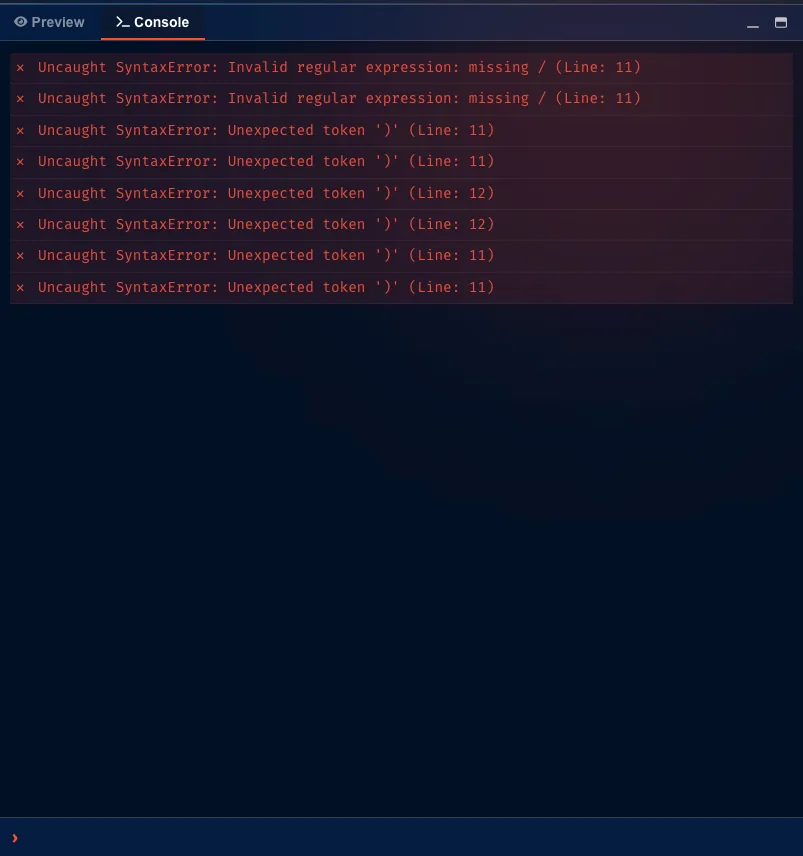
Console tab
Click the Console tab (next to Preview) to see JavaScript console output. This is where console.log() messages appear, along with errors and warnings.
Error messages
JavaScript errors appear in the Console with red text. The error message tells you what went wrong and often which line caused the problem. Essential for debugging.
Console.log debugging
Add console.log('message') or console.log(variable) in your JavaScript to print values to the Console. This helps you understand what your code is doing.
Status bar
The status bar at the bottom of the editor shows useful information about your current state:
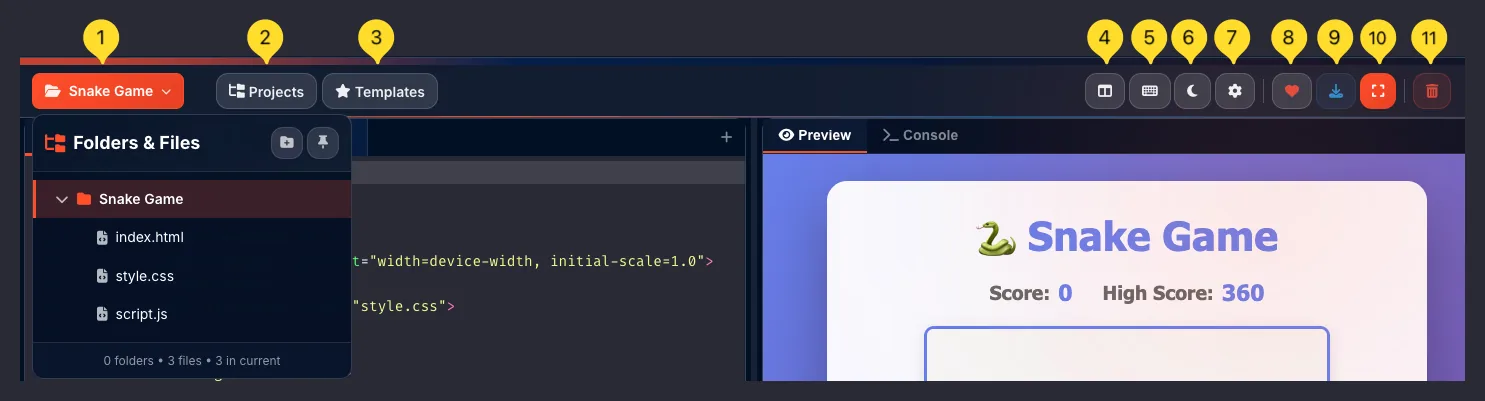
Folders & Files panel File Management
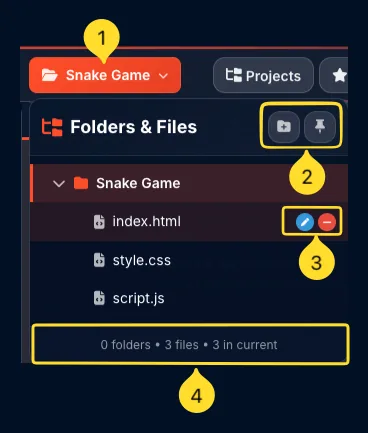
The Folders & Files sidebar shows your project structure and lets you create and manage files of various types.
Open the panel
Click the folder icon in the header toolbar, or look for the Folders & Files collapsible panel on the left side. Click to expand if collapsed.
Panel header
The header shows Folders & Files title with action buttons:
• New file button (add files)
• New folder button (create folders)
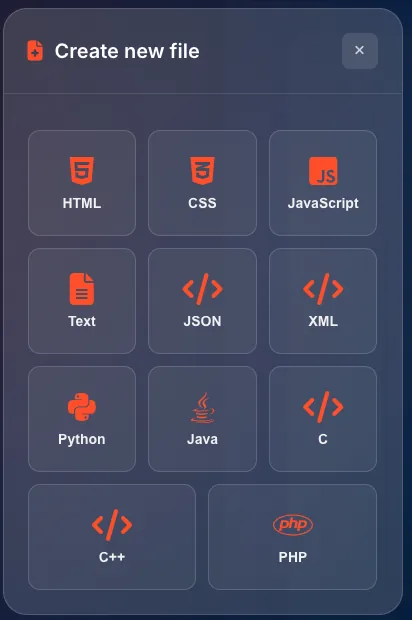
Create new file modal
Click New file to open the Create new file modal. A grid of file type buttons appears, each with an icon and label. Choose from 11 supported file types:
• Web: HTML, CSS, JavaScript
• Data: Text, JSON, XML
• Programming: Python, Java, C, C++, PHP
Click any button to create a new file of that type.
Project folder
Your project appears as a folder (e.g., Snake Game) with a collapse/expand arrow. Click the arrow to show or hide the contents.
File list with icons
Files are listed with colored icons by type:
• HTML: orange document icon
• CSS: blue stylesheet icon
• JavaScript: yellow JS icon
• Python: blue snake icon
• Java: orange coffee cup
• JSON/XML: code bracket icons
Click any file to open it in the editor.
Statistics footer
At the bottom: 0 folders - 3 files - 3 in current shows the count of folders, total files, and files currently open in editor panels.
File operations
Right-click a file for options:
• Rename: change the filename
• Delete: remove the file
• Duplicate: create a copy
Projects Project Management
The Projects feature lets you create, save, and switch between multiple coding projects. Each project is stored separately with its own files.
Open Switch project modal
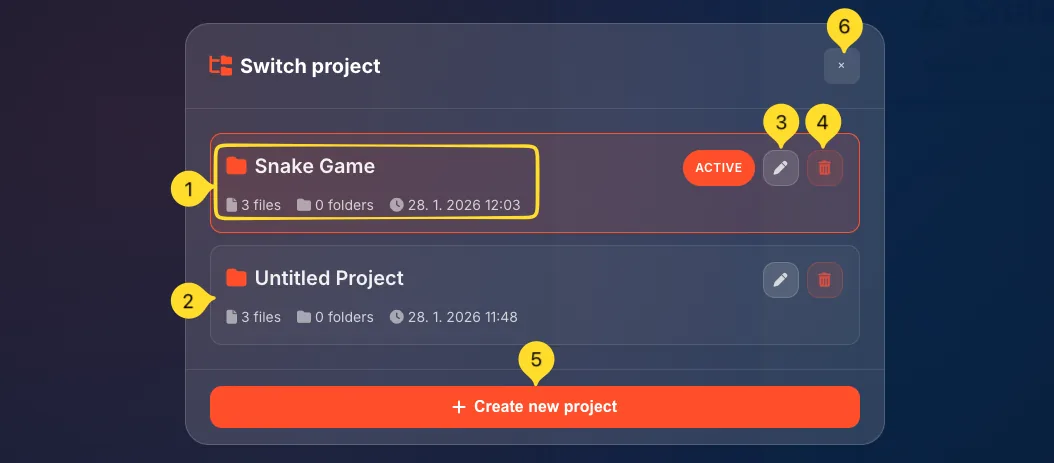
Click the project name dropdown (orange, in header) or the Projects button. The Switch project modal opens showing all your saved projects.
Project list
Each project shows:
• Project name (e.g., Snake Game)
• ACTIVE badge (green) on the current project
• File count (e.g., 3 files)
• Folder count (e.g., 0 folders)
• Last modified date (e.g., 25. 1. 2026 19:12)
Switch to a project
Click anywhere on a project row to switch to that project. The editor loads that project's files and the preview shows its output.
Edit project name
Click the pencil icon on a project row to rename it. Enter a new name and confirm. Use descriptive names like "Portfolio Site" or "Todo App".
Delete a project
Click the trash icon on a project row to delete it. A confirmation dialog appears.
Warning: Deleted projects cannot be recovered!
Create new project
Click the orange + Create new project button at the bottom. A new empty project is created with default files (index.html, style.css, script.js).
Close the modal
Click the X in the top right corner, or click outside the modal to close it and return to editing.
Templates Quick Start
Templates provide pre-built starting points for common projects. Instead of starting from scratch, use a template and customize it.
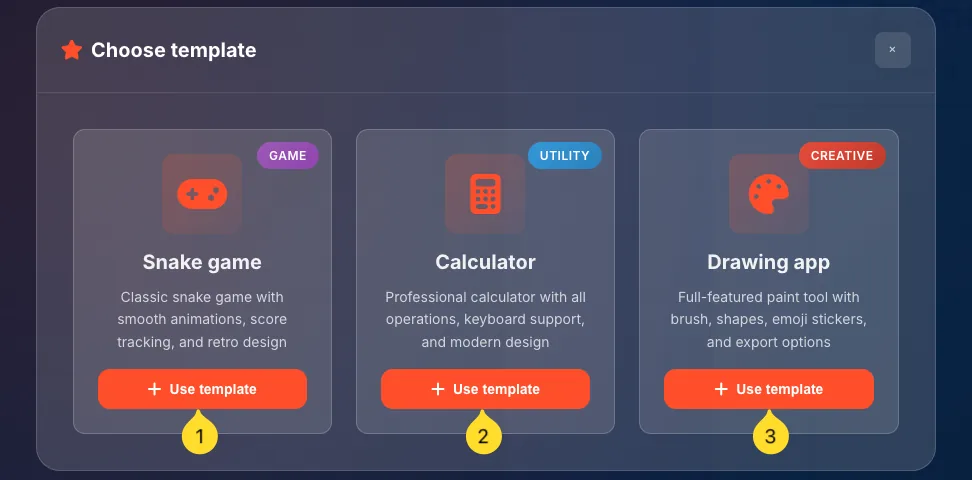
Open Choose template modal
Click the Templates button in the header toolbar. The Choose template modal opens showing available templates.
Template cards
Each template appears as a card with:
• Category badge (Game, Utility, Creative)
• Icon representing the project type
• Title (Snake game, Calculator, Drawing app)
• Description explaining what it includes
• + Use template button
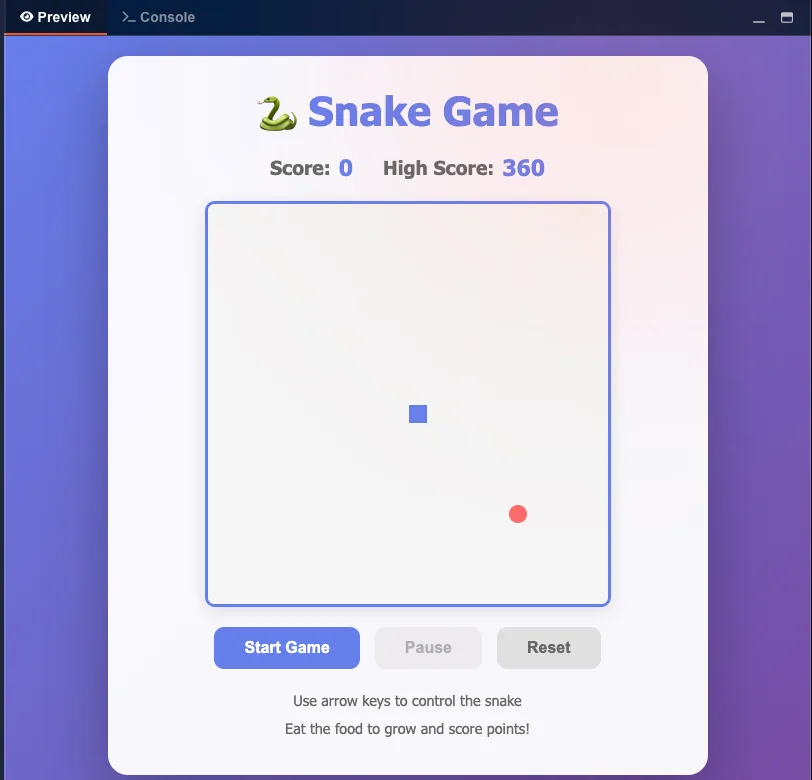
Snake game template
A classic snake game with smooth animations, score tracking, and retro design. Includes:
• Canvas-based game rendering
• Keyboard controls
• Score and high score tracking
• IndexedDB for persistent high scores
Calculator template
A professional calculator with all operations, keyboard support, and modern design. Includes:
• Basic math operations
• Clear and backspace functions
• Responsive button layout
• Keyboard input support
Drawing app template
A full-featured paint tool with brush, shapes, emoji stickers, and export options. Includes:
• Canvas drawing
• Color picker
• Brush size controls
• Save/export functionality
Use a template
Click the + Use template button on any template card. A new project is created with all the template files and code. You can immediately run it and start customizing.
Customize the template
After using a template, the code is yours to modify. Change colors, add features, adjust gameplay - templates are starting points, not finished products.
Layouts Workspace
Choose how editor panels and preview are arranged on screen. Different layouts suit different workflows and screen sizes.
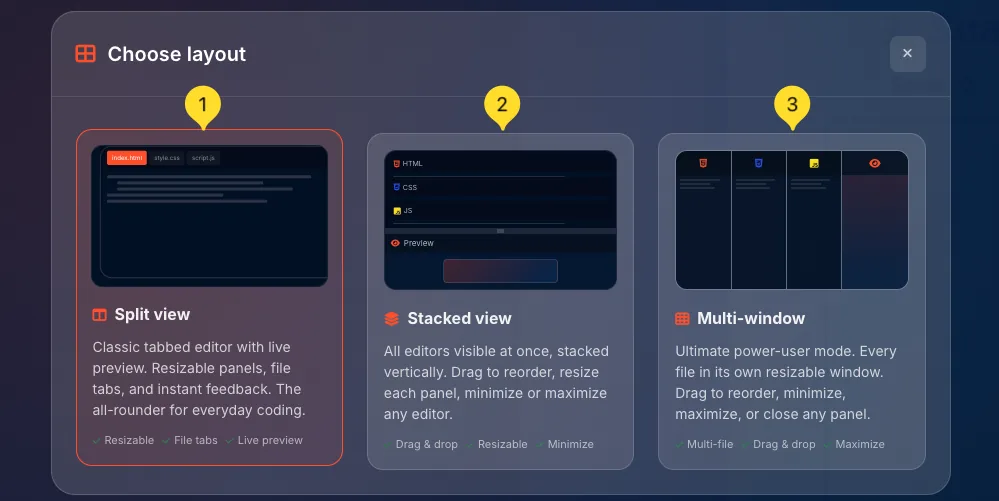
Open Choose layout modal
Click the layout button in the header toolbar. The Choose layout modal opens showing three layout options.
Split view layout
• Description: Classic tabbed editor with live preview. Resizable panels, file tabs, and instant feedback. The all-rounder for everyday coding.
• Features: Resizable • File tabs • Live preview
• Best for: Most users, standard coding workflow
Stacked view layout
• Description: All editors visible at once, stacked vertically. Drag to reorder, resize each panel, minimize or maximize any editor.
• Features: Drag & drop • Resizable • Minimize
• Best for: Seeing all files simultaneously
Multi-window layout
• Description: Ultimate power-user mode. Every file in its own resizable window. Drag to reorder, minimize, maximize, or close any panel.
• Features: Multi-file • Drag & drop • Maximize
• Best for: Power users, large monitors
Select a layout
Click anywhere on a layout card to select it. The editor immediately rearranges to the new layout. Your code and files are preserved.
Active layout indicator
The currently active layout has a highlighted border (orange/red). You can switch layouts anytime without losing your work.
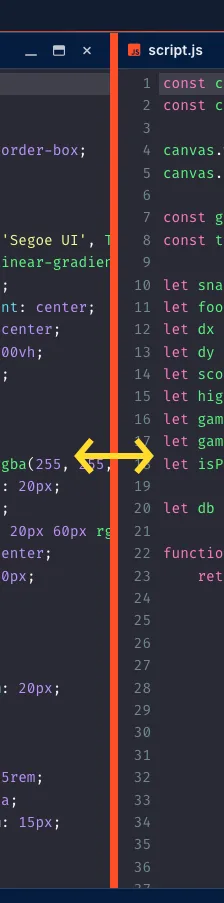
Resize panels
In all layouts, you can drag the borders between panels to resize them. Make the preview larger when testing, or make code panels larger when writing.
Editor settings Customization
Editor settings let you customize the editing experience. Access settings via the gear icon in the header toolbar.
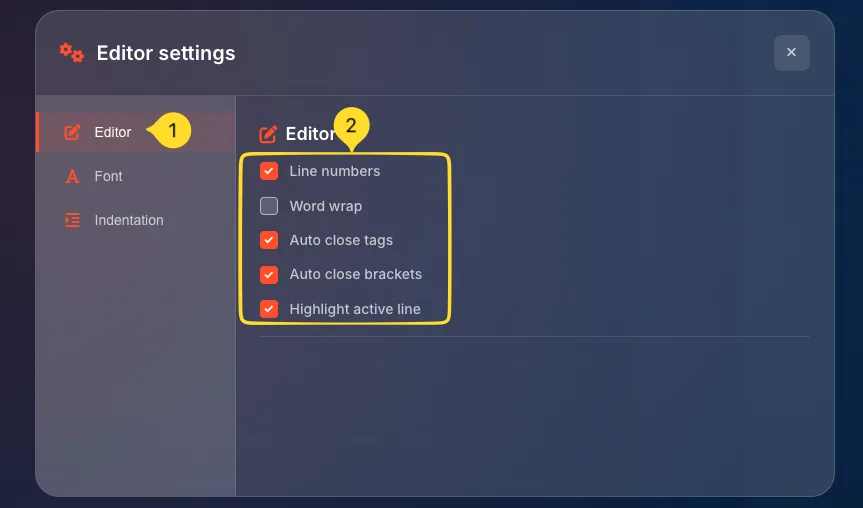
Open Editor settings modal
Click the gear icon (settings) in the header toolbar. The Editor settings modal opens with three tabs on the left: Editor, Font, and Indentation.
Editor tab - Line numbers
Checkbox: Line numbers
When checked (default), line numbers appear in the left gutter. Uncheck to hide them for a cleaner look or more horizontal space.
Editor tab - Word wrap
Checkbox: Word wrap
When checked, long lines wrap to the next line within the editor. When unchecked (default), long lines extend horizontally requiring scrolling.
Editor tab - Auto close tags
Checkbox: Auto close tags
When checked (default), typing <div> automatically adds </div>. Saves time and prevents forgetting closing tags.
Editor tab - Auto close brackets
Checkbox: Auto close brackets
When checked (default), typing { automatically adds }. Same for parentheses () and square brackets [].
Editor tab - Highlight active line
Checkbox: Highlight active line
When checked (default), the current line has a subtle background highlight. Helps track your cursor position.
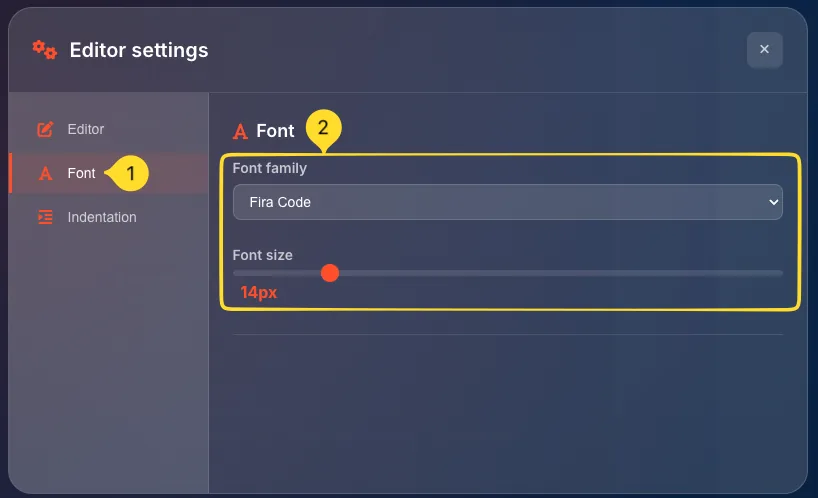
Font tab - Font family
Dropdown: Font family
Choose your preferred coding font. Default is Fira Code (supports ligatures). Other options may include Monaco, Consolas, or system fonts.
Font tab - Font size
Slider: Font size
Adjust the font size from small to large. Default is 14px. Increase for readability on high-DPI screens or decrease to see more code.
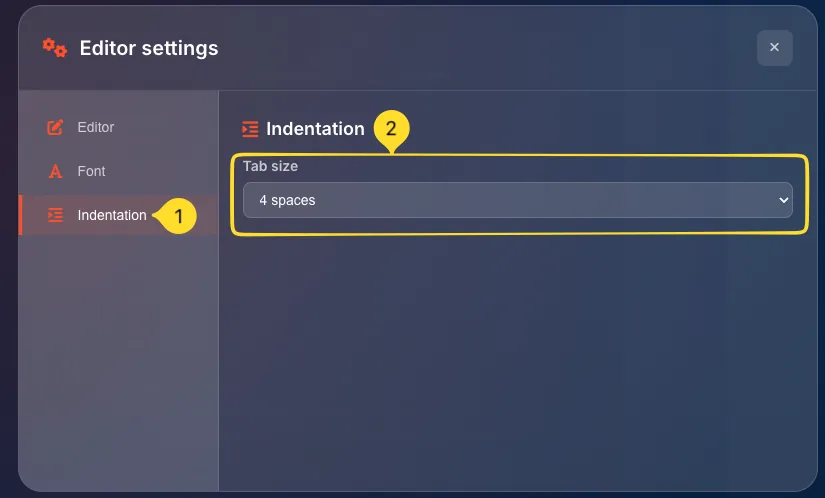
Indentation tab - Tab size
Dropdown: Tab size
Choose how many spaces a tab represents. Default is 4 spaces. Options typically include 2 spaces, 4 spaces, or 8 spaces. Affects how indentation looks.
Save settings
Settings are saved automatically when you change them. They persist across sessions. Close the modal by clicking X or clicking outside.
Typical workflow Step by Step
Here's a typical workflow for creating a project in the Code Editor:
Start with a template or new project
Click Templates to start from a pre-built example, or Projects → + Create new project for a blank slate. For learning, templates are excellent starting points.
Explore the code
If using a template, read through the HTML, CSS, and JS files. Understand the structure before making changes. Check the Preview to see what it does.
Make changes
Edit the code in any file. Start with small changes:
• Change text in HTML
• Modify colors in CSS
• Adjust values in JavaScript
Watch the Preview update in real-time.
Test in Preview
Interact with your project in the Preview panel. Click buttons, play games, fill forms - test that everything works. Check the Console for errors.
Debug issues
If something doesn't work:
• Check the Console for error messages
• The error often tells you which line has the problem
• Use console.log() to print values and understand what's happening
Iterate and improve
Repeat the edit-preview-test cycle. Make incremental changes. Commit to what works, undo what doesn't (Ctrl+Z). Build up complexity gradually.
Save and download
Your work auto-saves to browser storage. When finished, click Download to get a ZIP file with all your files. This is your backup and what you can deploy or share.
Tips & best practices
Frequently asked questions
Common issues: typos in variable names, missing semicolons, calling functions before they're defined, or trying to access DOM elements before the page loads. The error message usually points to the problem line.
<script> tag in your HTML to load libraries from a CDN.For example:
<script src="https://cdn.jsdelivr.net/npm/library-name"></script>.Place it before your own script.js for the library to be available.
<!DOCTYPE html>, <html>, <head>, and <body> tags.